

![]()
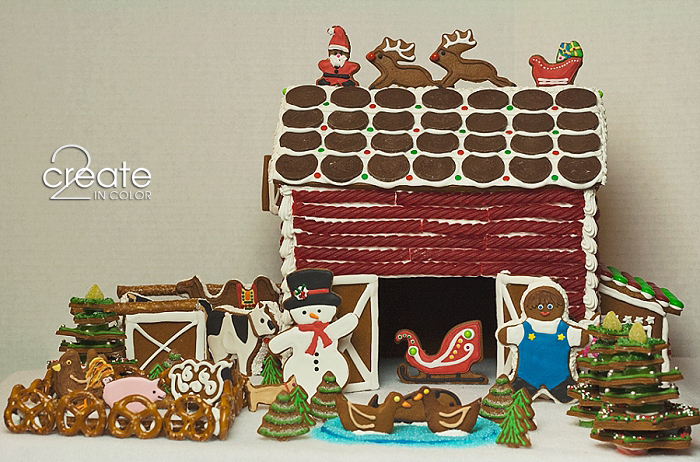
Whooo Hooo and E-I-E-I-O! I love my gingerbread house, and I’m really excited to get to share it with you in more detail now that the big reveal is over. It’s going to be picture overload, just so you know!
It didn’t take me long to settle on “Old McDonald’s Farm” as my theme once I set my mind to figuring it out. I’ve had a book called The Gingerbread Book by Allen Bragdon for years. There is a farmyard gingerbread house in there that has always caught my attention; since Sam and I had agreed that our themes had to come from something with a title (song, movie, book, etc.) good old Farmer McDonald came to my rescue :)
Everybody sing! “Old McDonald had a (Christmas Tree) Farm (and petting zoo…) E-I-E-I-O!
And on that farm he had a … ” errrrr, a few extra animals as well as the traditional (Who is making this house? What do you expect? My imagination always gets carried away LOL)
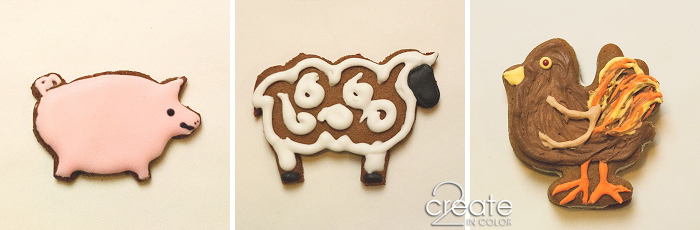
![]() A pig, a sheep, a chicken of sorts…
A pig, a sheep, a chicken of sorts…
![]()
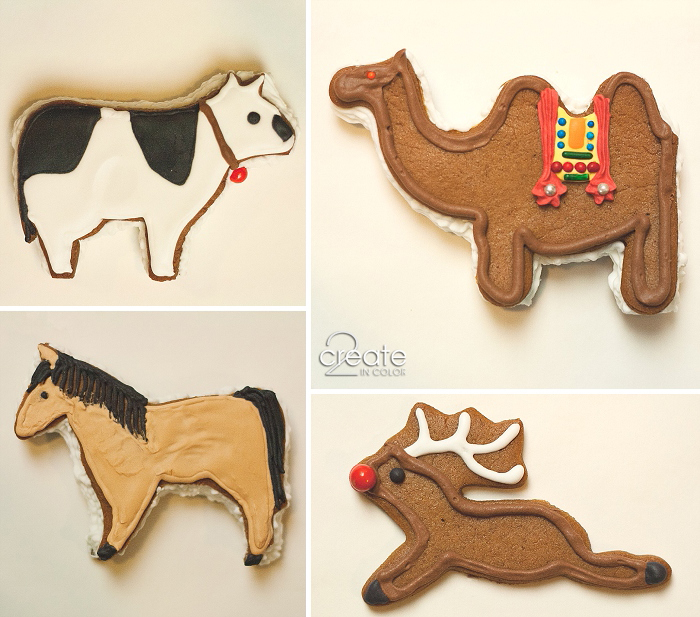
A cow, a horse, a camel that wandered away from the three wise men, and Rudolph the red-nosed reindeeer…
![]()
![]()
A calico cat (they’re all girls, did you know?), a dog, and a dinosaur (in honor of my other daughter Becca.)
And lastly, a duck or two, and why not a whale?! Old McDonald’s pond is like the Tardis of farm ponds: bigger on the inside ;)
![]()
![]()
You might have noticed that some of my characters are actually sandwich cookies. I was hoping they would be able to stand on their own, but it didn’t end up that way. But that’s OK, because it DOES end up that graham crackers (my spacers) and royal icing taste great together with gingerbread! The 2 pictures just below show what I did first. (Then I squiggled icing around just the edges of the cookie pair.)
![]()
![]()
Mixing 10 colors of frosting in 3 different consistencies was far more of a chore than I expected! I am glad I finally adopted Sam’s method of capturing the frosting in plastic wrap “plugs.” This was definitely the time for less fuss and easy clean up!
![]()
![]()
These trees are done with two different colors of green frosting. With all the sugars, it looks like at least 3 colors if not more. The effect is more obvious IRL, too. The stacked tree is made from the 3 smallest cutters from a Wilton set I have had for years. The whole set makes up a cookie tree that’s at least a foot tall, and takes as much gingerbread/cookie dough as this whole project I think. I did it once. I’ve blocked the details from my mind.
![]()
![]()
I put the colored frosting to good use, and had tons of fun. I love to play with frosting! Even if it is royal icing which takes a bit more care, you can really go crazy if you block out the time for it. I am certainly not a royal icing expert; more of a beginner, but I think these turned out pretty cute! I didn’t end up using the house I made for mister farmer-man because I just didn’t have room for it on my display board. Apparently 18″ x 20″ is somewhat limiting to me. Heh heh.
![]()
![]()
I tucked the dino into the barn — he was acting up to much to stay out in the petting zoo ;) What I really like about this is the unexpected treat of looking through the hayloft doors and staring right at him! Both he and the sleigh cookies are icing-glued to the broken chocolate coins remaining from my roof-tiling efforts, which act as supports for the cookies to stand up.
My husband’s workplace Christmas party included a white elephant gift exchange this year, but some people didn’t seem to understand the concept. We ended up with a gift bag that couldn’t have been more perfect: A kit for decorating 4 very large gingerbread men (including more kinds of candies!), a large bag of chocolate coins — my roof! (Also an awesome jug of ginger beer (soda, not alcoholic) from Trader Joe’s. Did you know I am a ginger beer aficionado? I am!)
![]()
![]()
The chocolate coins taste pretty good, and with the red and green discs I placed on with tweezers — ya gotta do what ya gotta do! — it actually became festive. Because it wasn’t before. At all. And then the mini-cutters I showed you in this post fit just right onto the peak of the roof. YAY!
![]()
![]()
Obviously, one of the reasons I couldn’t fit Old McDonald’s house onto my display is that I had sooooo many animals to corral up. The animal pen made out of the small pretzels is one of my favorite creative flashes! Then, even though my large sandwich-cookie animals wouldn’t stand on their own, they were stable enough (stable, get it? haha) to stay put with just their noses secretly icing-glued to something.
![]()
![]()
Pretzel rods were SO much easier than cutting cookie dough fence panels. Pieces leftover from cutting the needed elements were tucked into the woodshed as logs. And those messy animals! I guess animals will be animals; Raisinets lend a touch of reality ;)
![]()
![]()
The woodshed is my favorite part of all. I almost left it off due to my lack of space, but decided to squeeze it in. I claimed the roof for myself one evening at dinner, but my family all thought I meant the BIG MAIN roof piece! Wow.
![]()
![]()
A shot of the farmyard. My pond made from royal blue royal icing shattered in the back, so the water creatures got a “sweet” new blue-sugar layer to swim in.
![]()
![]()
When I got to the back of the house, I could NOT stand the smell of one more Red Vine, my scissors were totally gummed up from cutting pieces, and I was bored with siding the barn in red. A quick treatment for this side that turned out to be not-so-quick (but more appropriate) after deciding to put the silver balls along the roof edge. The messy roof edge that needed to be camouflaged!
![]()
![]()
The backs of trees had pretzel-piece stands, but they still had to be icing-glued directly to the batting. When you eat those, you get a little extra fiber in your diet: polyester, to be exact. I think the trees look like they have cute little bustles!
Lastly, the beginning. Construction tip: buy lots of cans that nest when they stack! Use a non-slip silicone baking mat and you’re all set for holding any tall panels in place vertically.
![]()
![]()
Mine certainly warped in the 3 days they waited for me between baking and assembly, but I managed… I am sure you wouldn’t be surprised to learn that I do NOT do the caulking around pur house! If I ever do a contest where you cannot use hot glue for the panel assembly, I’m making icing that matches the panels! Right? Right!
The homemade gingerbread panels came from one recipe out of the book mentioned above. Sam and I both went with a molasses-based recipe and it tastes delicious with hot coffee and tea, now that we are in the gingerbread-consuming phase. It smelled wonderful while baking and working with it. This dough would make good edible cookie ornaments! You might have noticed that I have some insight into that as you looked through the pics ;)
![]()
![]()
Basic Molasses Gingerbread Dough
from The Gingerbread Book by Allen Bragdon
8 cups unsifted flour
2 tsp. ground cinnamon (I used 3 tsp = 1 Tbsp.)
2 tsp. ground ginger
2 tsp. ground nutmeg (I used 1 tsp nutmeg and 1 tsp cloves)
1/2 tsp. salt (why bother?)
1 3/4 c. molasses (I used Grandma’s Unsulphured Original, which is dark but not “Dark.” One 12 oz jar is only 1 1/2 cups, BTW)
1/2 c. firmly packed dark brown sugar
3/4 c. butter
Combine all dry ingredients in a large mixing bowl.
Tip: Spray the measuring cup you will use for the molasses with oil cooking spray and then spread it around. You will be able to get the molasses out of the cup much easier. Measure molasses, brown sugar, and butter into a 2 qt. saucepan; heat over medium heat until butter just melts, stirring occasionally to combine.
Pour liquid into flour mixture and stir until well blended. At this point it will be very crumbly. Resist the urge to add liquid.
NOTE: I would not use any electric mixing appliance unless you have a bread kneading attachment that could handle several loaves of whole wheat bread.
While it is still warm from the molasses mixture, form dough into a ball and knead until smooth and pliable, 5-10 minutes. All of a sudden it becomes a wonderful clay-like consistency.
Roll 1/4″ thick on foil-lined cookie sheets using a lightly floured rolling pin. A long stick-style rolling pin would be helpful, but a roller-style with handles will work; I also used my 9″ fondant rolling pin. Check thickness with a toothpick — you can run out of dough fast if you don’t roll them thin enough. Refrigerate at least 30 minutes loosely covered.
Cut pieces using templates and/or cutters; remove and reserve excess dough for re-rolling. Bake at 350F for 12-15 minutes for large panels; less time for smaller pieces. Test that cookies are firm and lightly browned; an indentation should barely form when pressed in the center. My small pieces took 7 minutes on an insulated cookie sheet.
Cool completely on cookie sheets before removing foil from the pieces.
————————-
![]()
![]()
Thanks for letting me share all the details of my Old McDonald’s Farm Gingerbread House with you!
Next year, it will be a graham cracker challenge, though! Abbi will be 16 months old; let’s be nice to Sam LOL
Will you play with us?
Gail


.jpg)