![http://heatherballisonphotography.com Sheer, light, trailing goddess-ness :) -- Samantha in the Maternity Goddess Gown, June 2013]](http://www.2createincolor.com/wp-content/uploads/2013/08/Sam-maternity-01121.jpg)
What a partnership this gown was for us two, Samantha and I. Talk about 2create! Shockingly though, not in color this time, but we came to appreciate this creamy ivory as the weeks rolled past. I call this gown the Maternity Goddess Gown.
This was one of the biggest challenges I’ve had in my sewing life to date. I’m so glad I made these Disney dresses; the experience was crucial. Even though I had complete creative control over those and could change my vision if I couldn’t make an original idea work, it was still good preparation working with the sheer and slippery fabrics.
This gown… this gown was all Sam’s vision. Our communication skills were stretched in ways that were so good for my creative self. I’ve always been able to speak “beginner” but this was different. I needed to pick up her vibe about this project: just what was it about this gown, also here that needed to translate into what we could actually pull off. Click that link. It is worth seeing, and explains all my angst.
(sewing details and comments in the hovertext and italics below)

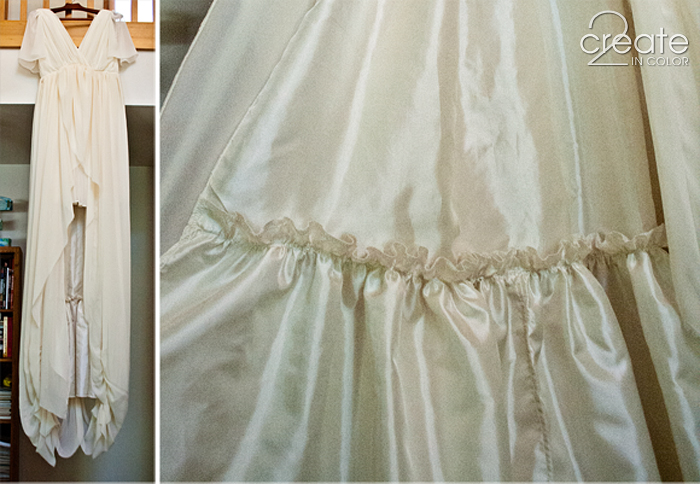
INNERMOST LAYER: Made from a crisp but very light taffeta that rustled when it moved in a delightful way, this underlayer added some visual texture and helped support the two other chiffon layers. It was folded into 2 large box-pleats at the back waistband. A bit more than half the ruffle dragged on the ground. Especially helpful in protecting the other chiffon layers from 63,846 snags from the field of wild grass and weeds the photoshoot was held in!!!
Creatively, I used my imagination to pull together an assortment of experiences to do a few specific things: pleats in the back instead of gathers, to keep the fluffiness down. Making the shirring happen Just Right on the outer skirt layer. Using a stiff, crisp, but oh-so-light taffeta as an underlayer to keep the chiffon from falling too flat. Changing the sleeves (which started here) to the floaty capelets they eventually became (and THANK GOODNESS FOR FRAY BLOCK! no hemming!) Re-doing the top of the zipper and back neckline so it framed her tattoo just so (see opening photo.)

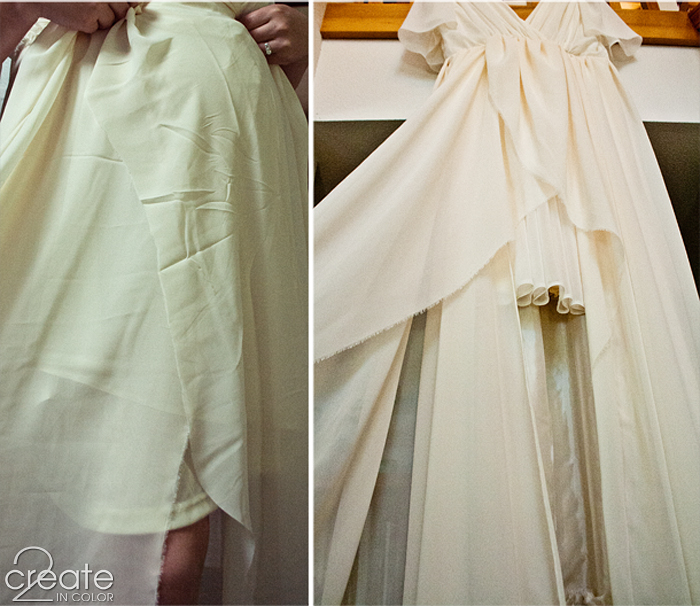
OUTER LAYER, the beginning. We spent a lot of time while I test-draped this effect — the split pulled-away panels. I knew how it was supposed to work, but hadn’t ever done it before. Sam was very patient and never once expressed alarm, panic, or said anything to the effect of “let’s just forget this” LOL I think it worked out very well…

Creatively, I used my engineering skills to figure out the draping, the gathering, how much to angle the cuts, how to attach the many layers in an elegant rather than an awkwardly bulky way, even though these teachable skills haven’t been taught to me. Somebody figured them out in the past; no reason I couldn’t figure them out for myself, right? And so I did! :)

OUTER LAYER under construction: This is how the outer-most of the 3 skirts I attached was constructed. It wrapped from the left side in the front, all the way around the back and then all the way across the front again to the right side (Sam’s photo, 2 above) The front has the diagonal swags that curve around and under the baby-belly. The back started with pleats at the waistline and then went down into a long train with the shirring detail across the bottom. All the edges were torn, unfinished, fraying edges to keep the look light and modern.

DETAIL from the underside of the train: 5 rows of this shirring across the bottom of the train. I sewed a tuck, starting 5″ up from the edge and going for 20″. I put a piece of stretch lace inside, and gathered the 20″ of fabric down to 10″. I stitched the tuck to the lace every inch along the way. That’s 55 places I tacked those things together 8-| But I did it so that the gathering along each of the 5 lines of shirring, ruching, gathering — whichever term you prefer — stayed evenly spread out instead of sliding all to the bottom of the train.
Next up, the lining.

ORIGINAL LINING ALTERATION: The original lining to the ready-to-wear dress was loose and flowy, appropriate to THAT dress, but not our gown. We took it in nice and snug under the baby. Only the sheer fabrics then tented outward from the top of her tummy, and this really helped bring an elegant, more delicate maternity look. GOOD CALL, Sam!
Side story: I included a photo of the old tin I keep safety pins in. Those 4 chocolates you can buy these days in a cardboard box used to come in a tin like this. My kids knew, when they were little, that the clothes I was sewing for them were safe to try on if I used safety pins — no getting stuck with straight pins. Same tin I’ve always kept them in. In a few short years, I hope to be safety-pinning garments out of this tin for the Skittle-girl to try on :)

With the lining pulled snug under the baby-belly, a much sleeker and elegant profile shadows through the sheer fabrics. I love this photo!

PUTTING IT TOGETHER: What’s going on in the picture above? The almost 7 foot long outer skirt/train is stitched onto the dress waistband and flipped UPward, inside out, heading out of the top of the photo and draping off of one end of my worktable, while the other two skirt layers (having been stitched onto a piece of the discarded original belt ties) are pinned onto the waistband and are draping DOWNward and off the other end of my worktable. This is the left side of the back. Had to repeat it all on the right-hand side, too. The extra belt tie length was trimmed down later.
Why did I do it this way? If I’d tried to stitch all those layers to the 1 inch wide waistband it would have been horribly bulky! As it was, the waistband was super thick because of the way I narrowed it down when I was doing the basic alterations I talked about in the previous posts. Now ya know. Because, maybe, you needed to.

The dress is ready to go and is hanging from my 2nd floor stair rail. Say, “Ooooooooooooh” with me! I love the look of this detail! But that’s because I’m a complete and total fabric geek.
And so on the hottest day of the year, I finished (literally) clipping the loose threads, steaming the chiffon layers, and sending the gown (with the anxiety equal to sending a child off on the first day of school) with Sam to her late afternoon/evening maternity photo shoot. How she survived, and still managed to look so beautifully cool, calm, and collected is a small miracle!

Hanging up, fully pressed and ready to go. The picture on the right is me proudly showing off one of my engineering solutions and the fact that it turned out well. For sewists, that’s a bias cut edge on the right sewn to the straight grain back skirt/train panel, on my ghetto serger, with a rolled hem style seam. Go me!

Fun in the sun! And, Goal: Accomplished! Oh… ever wonder what the third skirt layer was? Boring, but critical: a full wedge of chiffon sandwiched between the other two skirt layers, to sheild the taffeta edges from view, keep it from shining through the outer layer, and help it all fly in the wind! I think this picture was taken just for me ;)
Whether you have been interested in the technical details or not, I thank you for letting me finish clipping the loose ends on this maternity goddess gown project so I can now enjoy the professional photos without that layer of distraction, and so I can now file away my experiences for the next time I take on something out of my comfort zone… which I seem to constantly do!
Gleefully anticipating the arrival of Skittle, I am off to visit Sam for lunch and a last pat or two (or twenty) on the Skittle-belleh. Who knows, maybe she’ll go into labor while I’m there! I know she’d be glad :)
Gail
PS She didn’t go into labor while I was there. Disappointment! (for both of us)


.jpg)