

![]()
If you have a certain 80’s song stuck in your head now, you’re welcome! It’s been in mine off and on while working on this oversize amigurumi chameleon.
The song actually says karma chameleon, I know ;) but I couldn’t resist naming her Carmen just to be “punny!”
![]()
I thought it was long past time to add another “Abbi-gurumi” to the toy basket here at Grandma’s house. A colorful one, obviously! Abbi and Ella are definitely the right ages for playing pretend with as many creatures as there are available. Won’t they be surprised to find this colorful lady waiting for them the next time they come down?
![]()
When I went looking for crochet amigurumi patterns a few weeks ago, I didn’t limit myself to only free ones as usual. Frugal-me stepped aside. This time, I wanted one that reached out and said, “Me! Me!” regardless.
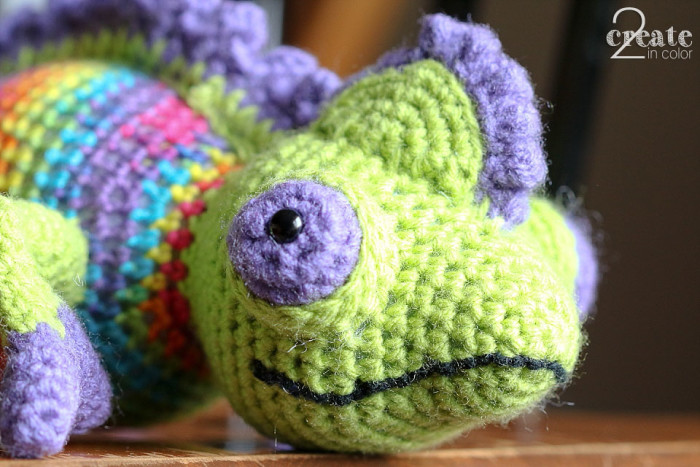
Naturally, this very bright crazy-colored creature caught my eye. Lime green — win! More fun colors — win! Complicated enough to stay interesting — definitely! And so unique.
I just had no idea she was going to be so BIG! Which means, I had no idea it would take so long for me to do!

![]()
I found this pattern for Camelia Chameleon (renamed Carmen) through amigurumipatterns.net. This is a great site to shop for many designers’ patterns both free and premium. I’ll be looking for Janine Holmes’s patterns (Moji-Moji Design) again. I highly recommend them (no affiliation, yadda yadda …) I found this one to be extremely well written, well designed, and with great photos of all the steps along the way; it made hooking up all these pieces and parts very easy.
![]()
My only frustration was my own problem counting stitches after not crocheting in the round in so long! At least I didn’t have to be frustrated losing stitch markers — since I began using the starting tail as my row marker, I have no worries. See how it works…
![]()
Once you reach the point where you would insert the crochet hook into the same spot as the yarn tail is in, you are ready to begin a new round. But before you make that first stitch of the new round, just reach inside, pull the yarn tail out of its spot, and lay it beside the stitch you just finished. Crochet right over the top of that yarn tail, enclosing it between stitches where it will stay secure until you make it all the way around again. You can see another in the photo below, where I am a few stitches into the new round.
![]()
![]()
![]()
That head looks like a curtain rod finial before head crest, eyes, and mouth get attached! Doesn’t it? And, it’s always a surprise how much stuffing these creatures take.
![]()
I was also slowed down a bit by the three days being substitute mom (#designatedbabysitter) to the grandgirls smack in the middle of having a cold. This required lots of naps and far less crochet time than expected! But a lot more fun :)
![]()
What do you do when a three-year old wants really badly to help you crochet? Eventually I figured out Abbi could pull yarn out of the skein for me. I offered to teach her to crochet after she turns six. She wants “a pink one of those crochet things, grandma.” Pink crochet hook: check.
![]()
I did manage to get the little pieces and parts made while there. Two layers each for the head crest and spine spikes (both head crest pieces, but only one back spikes piece shown above.) The double layering gives them good dimensionality which keeps them upright on the critter.
There was a bit of sunshine to enjoy during one naptime, so I went outside on Sam’s front porch to take these photos! (Meanwhile, Sam was in Texas with friends at IF:Gathering and Magnolia Market!)
![]()
![]()
I made a couple minor changes to the pattern, but not because I was unhappy with it.
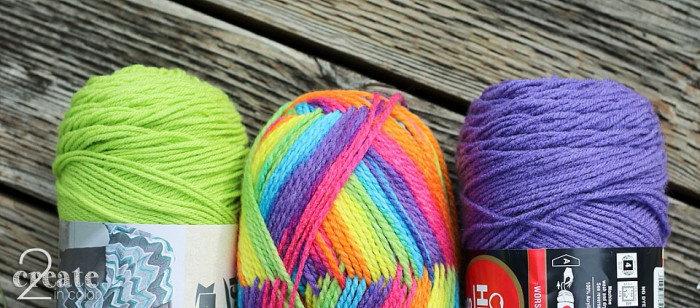
- Instead of buying all seven different colors of yarn for stripes (where DID all my acrylic yarn go?) I bought three skeins total: green, purple, and a variegated for the body. I love the way they coordinate so well!
- I skipped the white yarn called for in the eyeball, sticking with purple.
- I always use the Magic Ring method of starting crochet rounds, especially for amigurmi, instead of the traditional method. Here is Sam’s and my favorite Magic Ring how-to. You can really see how tight that first round is if you look back to the head/body in-progress photos.
- Last, I added an extra round on the eyelid layer: a final round of ‘slip stitches into back loops only’ gave a smoother transition from the top layer green eyelid to the under layer purple eyeball.
![]()
Even though all three yarns I bought were labeled “4” bulkiness, the variegated yarn was much skinnier than the other two. I ended up with skimpier crochet fabric over the body area than I prefer. I hope the stuffing doesn’t start migrating out too badly. Lesson learned — swatch up the yarns if they are different from each other so there are no surprises like this. You can see it in all the pictures of the finished critter.
![]()
I almost skipped the black plastic safety eyes, but after double checking photos of actual chameleons I felt they were necessary. So I had to go to the store … the next day … bringing you this post a whole extra day later. That’s how much I care that this amigurumi had the best possible eyes. Just for you … and just maybe for Abbi and Ella, too.
Also, if you looked at that link, did you have any idea there were that many different kinds of chameleons!? I may have spent some extra minutes looking at those photos being wowed.
![]()
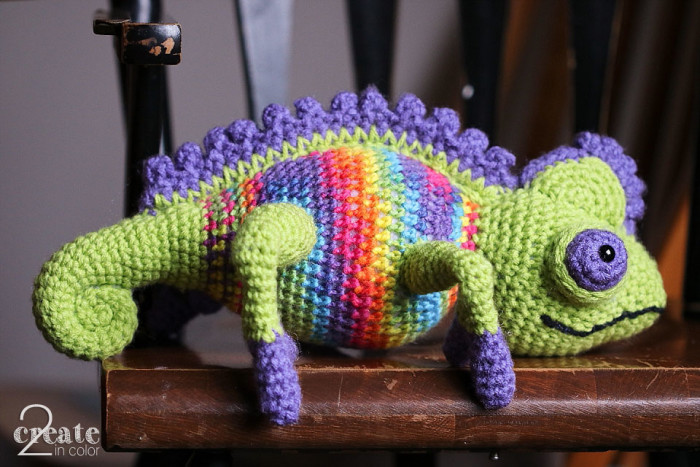
Also-also, have you ever noticed a chameleon’s feet before? Looking at those photos, I became so tickled by their mitten-like feet with the thumb section inward and finger section outward. Although frontward and backward pointing toes might be cuter on a toy, and not cause comment from the uninformed, those sweet little mitten-y feet won me over. Carmen Chameleon has feet that are anatomically correct.
Having pipe cleaners, aka chenille stems, inside the legs lets Carmen be a poseable chameleon. It is still necessary to use some hidden stitches to hold the knees into a bent position, though.
Trivia: Chameleons actually do have a total of five fingers on the two halves of each foot, 2 on one side and 3 on the other, but they are very short and hard to notice. Here’s a fun video where you can see the eyes, spine spikes, mitten feet and toes of someone’s pet chameleon “washing hands.”
There are a lot of hidden stitches to hold that tail in place, too!
![]()
When I sneak-peeked this on Instagram and Facebook a couple of weeks ago, there were guesses of chameleon and hippocampo: sea-horse! Compliments to Becca who guessed correctly. Now I am kind of itching to crochet an amigurumi sea-horse.
![]()
Find us on Facebook and Instagram! Extra stuff always shows up there, including a lot of food.
Keeping it colorful!
Gail


.jpg)
Kat - She’s darling! And I love her!02.10.2017 – 3:42pm
Diane Johnston - Gail…You do such beautiful work. This little guy…or should I say guyette as my hubby likes to say…is so adorable. I love the colors. I did get caught up watching the videos. I had no idea there were so many different chameleons.
I, too, like to find needlework that is complicated enough to be interesting. I haven’t done crocheting for probably 40+ year. I also used to do crewel embroidery. Now, my love is counted cross-stitch. Especially the Mill Hill Buttons & Beads kits. You can see the ones I’ve done on my FB page.
Hugs, Diane02.15.2017 – 11:19pm