


![]()
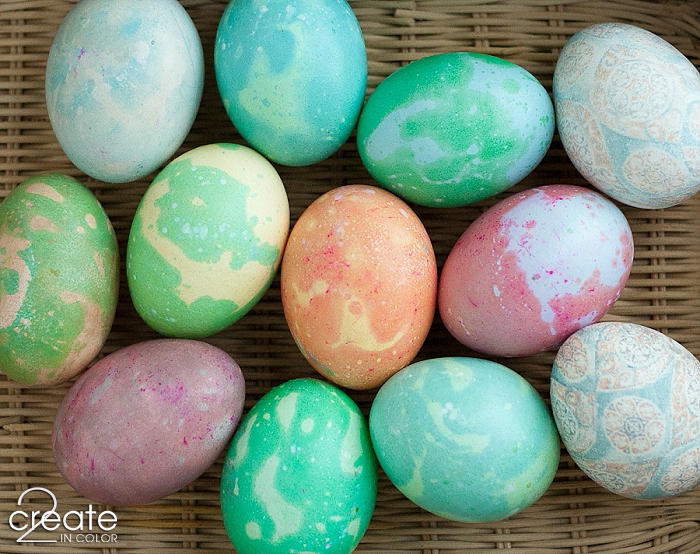
There’s a bit of a pun going on here! I have both eggs that look as if the’ve been tie-dyed, and eggs that have been dyed with a tie!
![]()
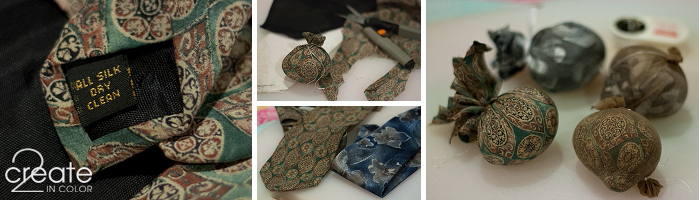
To dye eggs with ties, you need real silk ties. Another fabric most likely won’t give up its dye to the eggshells, so visiting your nearest donation store such as Goodwill, Value Village, or whatever is in your area is your first step. Look for ties or ladies’ scarves made from 100% real silk in small detailed prints.
![]()

![]()
Quick lesson: Deconstruct the ties, wrap the silk fabric snugly around the egg and tie it off with string, twist ties, floral wire, or dental floss. Wrap and tie again using muslin, a few layers of cheesecloth, or nylon stocking segments. Simmer room temperature wrapped eggs for 20-40 minutes in 3 quarts of water + 1 cup of white vinegar. Remove from pan and let cool.
![]()
Unwrap when cool enough to handle. The longer you boil them, the more colorful they will be! The snugger the wrapping, the more of the details from the print will show.
And voila!!! One silk tie with beautiful results! The paler egg had the “wrong” side of the fabric against the shell; the more vivid print had the “right” side of the fabric against the shell.
![]()
Even the back sides — their bunched-fabric “navels” — look cool! And the other tie was obviously not silk. I wasn’t sure! It transfered nothing but some random tannish lines. Sometimes people have gotten faint transfers from polyester. I was hoping for some pale blue, but nope! Oh well! The others made up for it in my mind :)
![]()
NOTE: I’ve heard you shouldn’t eat these silk dye transfer eggs. I’ll see how much dye transfered to the inside when I peel them, but they AREN’T food dyes, guys! So beware.
On to the next batch! To get the blobby streaky blotchy random color play on the second method, first dye eggs a pale color using an egg dye kit or: 1 cup water, 10 drops liquid food color, and 1 Tbsp vinegar.
![]()
Once they are dyed and dry, prepare the second set of dye baths. You will want to use something like a deep cereal or soup bowl; something large enough to be able to move the egg around with your fingers fast, deep enough to hold enough dye to just barely cover the egg! Fill each with warm water (1.5 cups for mine) and a big ol’ squirt of liquid food color (30-50 drops if you want to count,) plus 2 Tbsp vinegar. Add the magic ingredient, a Tablespoon of cooking oil (doesn’t matter which kind) that should cover about half the top surface of the colored water.
You probably want to use a glove on one hand for this part, and have a slotted spoon handy for lifting eggs out, and some paper towels or napkins to land the eggs on and wipe them with. Things get slippery from the oil!
![]()
Whip/whisk the oil in the dye so that it breaks up into little droplets. Immediately dunk the egg and roll it around so that the little droplets of oil stick on it here and there, leaving other parts exposed to the stronger dye.
![]()
Wow! Leave it in there for a minute or less — take it out when the second color is as strong as you like. Careful — they’re slick! Blot dry and set aside to … cure?
![]()
After you finish with all of them, you can go back and polish off the extra oil from each. The eggs get a beautiful sheen from it! Another bonus: condensation from refrigerated eggs being hidden by the Easter Bunny won’t make the colors run as much!
![]()
![]()
Use colors that contrast well but won’t go muddy when they are layered — red/pink dye over pale yellow, green dye over pale blue, blue dye over pale green for example. Putting someting like pink over green or purple over yellow won’t have the pop, but you should play around! Maybe your combination will look great!
![]()
I have rose over yellow, rose over blue, blue over green and green over blue. I also did a green over green … because one cannot have too much green! ;)
I tried rescuing some of the less-than-lovely eggs from my Easter Egg Playday on Tuesday… What do you think? Um, yeah.
![]()
![]()
Red wine egg — no hope LOL The egg that took a brief bath in red onion skin dye (the one that didn’t turn eggs green as advertised) looks better for it’s overdye. And one egg that didn’t do anything much in the avocado skin method (still going to work on that!) I went ahead and overdyed in blue. Hmm… The blue one is pretty! ;)
![]()
I have just as much fun experimenting as I have making pretty eggs. Isn’t that what it is all about?
Hope you’ve enjoyed the color show today! We 2 DO create in color after all :)
Hope you’ve also enjoyed Egg Week:
Monday
Tuesday
Wednesday
Thursday
Happy Easter!
Gail


.jpg)