

![]()
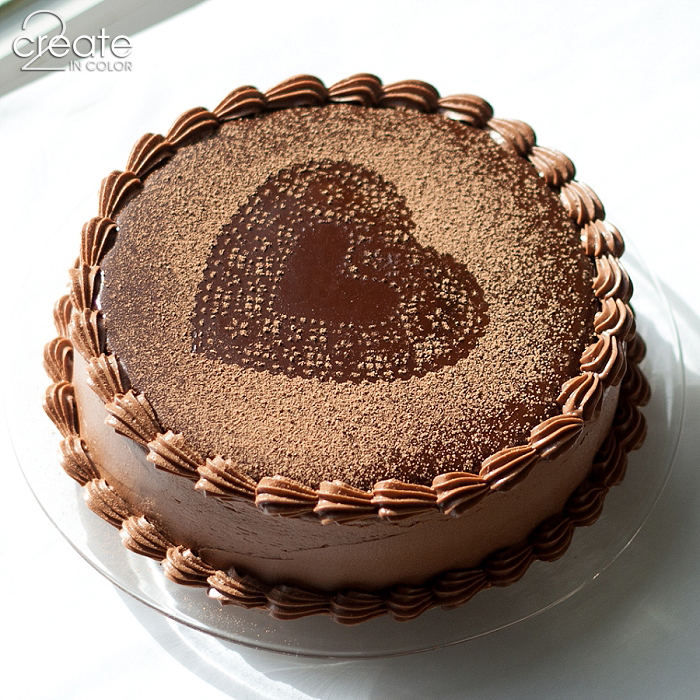
Have you recovered from any Valentine’s Day chocolate splurge you may have indulged in? I ask, because today I’m bringing you the four recipes I used to create my February Challenge here, my Chocolate Coma three layer dessert. It was sooooooo gooooood, and like all good cheesecake-containing desserts it seemed to get better overnight. For a couple of nights. Then it continued to hold its own until it was GONE :) No, I didn’t eat it all. But I could have. Shouldn’t we all love our own baking? I think so. One more look at the picture…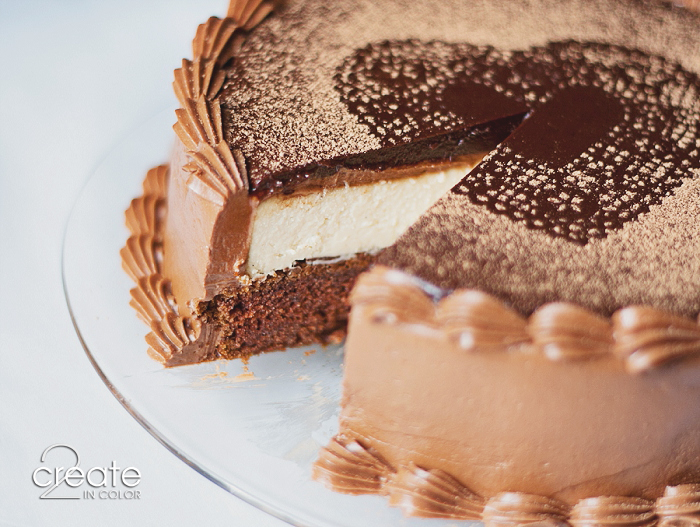
![]()
Mmmm! I’m ready to make it again. Seriously. Yes, it was 4 recipes. But individually they’re not that difficult if you stay focused on the task at hand. That sounds lame, but really … let me walk you through how I got this D.O.N.E…
The evening before I needed the dessert, I pulled out all my cold items for the cake and cheesecake: cream cheese, butter, eggs, cream, buttermilk (or milk + lemon juice.) Oh, didn’t I mention that you’ll get a nice calcium boost from this cake? Bonus! I also pulled out the correct amount and kind of chocolate I wanted for the next day’s espresso ganache.
First thing I did was slice open a gorgeous vanilla bean, stir seeds and pods into some cream, heat it to just barely a boil, then set it aside to become infused. Make sure you are saying “infused” in a reverent voice. Vanilla bean infused cream deserves it! (Instructions with cheesecake recipe below)
I mixed up the Old World Chocolate Cake recipe. This cake happens to be one of the easiest types of cakes to make. I measured out 2 groups of ingredients after turning on my oven and preparing the pans, then mixed, poured, and baked. Cake is in the oven in less than 20 minutes! (cake recipe below)
![]()
While those 2 layers were in the oven … Oh, didn’t I mention that you’ll have an extra cake layer for the freezer? Another bonus! OK, onward… I unwrapped the cream cheese, beat it until smooth, then added one cheesecake ingredient at a time. No crust was needed, so it was ready to pop into the oven the minute the cakes came out. They even baked at the same temperature! (cheesecake recipe below)
While the cheesecake baked I did up my dishes. While the cheesecake cooled enough to put into the frig, I got ready for bed. I wrapped everything up and tucked it away in the refrigerator and said, “I’ll see you tomorrow!” Total time: 1.5 — 2 hours including time to check facebook ;) and walk out of a clean kitchen in my jammies.
Next, it’s all goooood morning, chocolate! Heated more cream almost to boiling, dumped in some ground coffee. Chopped chocolate, strained hot espresso cream over it, stirred it just right and set it aside. (ganache recipe and instructions below)
Mixed up my go-to Fast Fudge Frosting. Triple F is as easy as boiling water. Honest! ;) Just read the recipe! (below)
(Assembly instructions here!) Cheesecake (cold): removed springform ring but left the base on, and cleaned up any loose bits. Dried moisture off the top; added a generous blob of frosting as glue. Put cold, firm cake layer centered on top. Put cake plate upside down on top of that. Turned it all over and peeled away the springform base from the cheesecake. Done with the layering! How easy was that!? (don’t believe that first picture — the cake was only on the plate by itself to get its picture taken ;) )

![]()
I slapped some frosting around the outside of the cake — frosting on top as pictured is not actually suggested; leave it naked! Then I did some piping around the bottom and top. (Don’t worry, it’s Fudge Frosting. Bad piping tastes just as delicious as good piping, but you need to build a dam of some kind around the top edge; create your own style if you wish!) Don’t be jealous of my mad frosting skills (hahaha) I used to get paid to frost cakes!
The whole frosted stack of yumminess went in the freezer for a bit.
At this point, you could switch some laundry to the dryer if you need to. Or sweep. Empty the dishwasher? I sipped coffee and stared at the cooling ganache. Morning and I don’t really get along, but it is my favorite time to decorate baked things. I know. I don’t get it either.
Almost done — next, I poured on the ganache in one fell swoop over the chilled cake, tipping it slightly around to make it spread out to the frosting “wall.” Then I dug out a heart doily, made a handle out of the sticky part of a sticky note and sifted some cocoa powder over the top. You can skip that part if you want. I needed to make it look extra-special just for you guys.
![]()
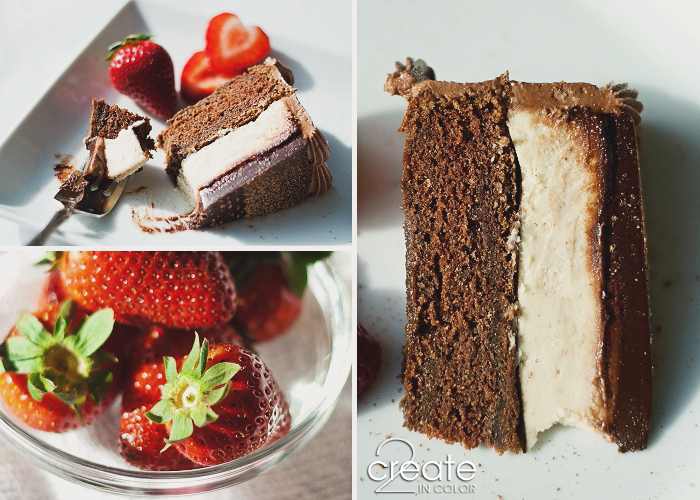
Then I had to cut its extra-specialness for a picture just for you guys. Which meant I had to eat that slice. For breakfast. Just for you guys. It was a rough start to the day ;) Total time for second work session, including staring at the cooling ganache: more than an hour, but not much. It goes much faster than it reads LOL
Old World Chocolate Cake
adapted from Farm Journal’s Choice Chocolate Recipes cookbook.
In your mixing bowl, measure and whisk to combine:
1 1/2 c cake flour; to use regular flour swap out 3 Tbsp flour for 3 Tbsp cornstarch
1 1/4 c. sugar
1/3 c. unsweetened cocoa powder (I used sharp-tasting Droste, but any will do)
1 1/4 tsp baking soda
3/4 tsp salt
Add extracts to the buttermilk and have ready:
2/3 c. butter, softened to shortening consistency
1 c buttermilk (or 1 Tbsp lemon juice plus milk to make 1 cup)
2 tsp vanilla
1/2 tsp almond extract (optional)
2 eggs (optional: add 1 more yolk and set aside the white which will be used the cheesecake)
Grease bottom only of two 8″ round pans (optional extra step: line bottom only with parchment and grease again.) Flour pans. Preheat oven to 350F.
Once dry ingredients are combined, add butter and 2/3 c. of the buttermilk mixture. Beat at medium speed with a hand mixer for 2 minutes. Add the rest of the buttermilk and the eggs; beat 2 more minutes or until the beaters start leaving ribbon-like swirls in the batter.
Pour into cake pans. Bake 30 minutes at 350F. Test for doneness: toothpick inserted in center should come away with moist crumbs; edges of cake should be barely, if at all, pulling away from the sides of the pan. Cool 10 minutes on racks; remove from pans to finish cooling.
Very Vanilla Cheesecake
Butter a 7″ to 8″ springform pan, bottom and halfway up sides (optional extra step: line bottom only with parchment and butter again.) Preheat oven to 350F
Make vanilla-infused cream:
1/3 c. half and half (any Whipping Cream mixed half and half with any Milk will be fine as a substitute)
1 vanilla bean
Slit vanilla bean open along its length, scrape out the seeds and stir them into cream; cut the pod in 2-3 pieces and also put into cream. In a very small saucepan or microwave-safe cup, SLOWLY heat this mixture just until steamy and it barely starts to boil, stirring gently a few times. Set aside to cool.
2 8-oz. packages cream cheese (one could be low-fat/neufchatel)
1/4 c white sugar
1/3 c packed brown sugar plus 1 Tbsp
1 egg plus 2 egg whites
1/4 tsp vanilla extract
1 scant Tbsp flour
Beat room temperature cream cheese until smooth. Add sugars, beat to combine. Add eggs and whites and vanilla extract, beat to combine.
Strain vanilla-infused cream into liquid measuring cup, pour away all but 1/4 cup (reserve the extra to add to ganache if desired.) By hand, stir 1/4 c. vanilla-cream into cheesecake batter. Sprinkle flour over the top of the batter, then stir in.
Pour most of batter into prepared springform pan: The smaller sized pan option will have leftover batter because you don’t want this layer to be too thick and heavy. My 7 1/4″ springform pan filled to my liking also gave me two 6 oz ramekins filled about 2/3 full of leftover batter. Mmmm ;)
Bake at 350F until just the center half of the cheesecake jiggles when the pan is shaken, about 30 minutes. Turn off oven and prop the door open a few inches; let cheesecake remain in oven 15 minutes. Set on rack to cool.
Cover pan and refrigerate until cold. (Ramekins will be done and can be removed after 20 minutes in the oven.)
Notes; If you are making this cheesecake by itself, not as part of this stacked dessert, put all the batter into the springform pan. Start by making any crust you wish to use; I think graham cracker would be great, or a pecan-containing crust. If you wish to use a 9″-10″ springform, double the recipe and adjust baking time to an estimated 40-60 minutes — just do the jiggle test every 10 minutes starting at 40 min.
Fast Fudge Frosting
from Better Homes & Gardens Cookbook (the red plaid one)
Enough to fill and frost two 8″ or 9″ layers or a LOT of graham cracker sandwiches.
1 tsp. vanilla
1/3 c. boiling water
In a mixing bowl, measure:
1 lb powdered sugar (3 3/4 cups unsifted, or 1 box)
1/2 c. unsweetened cocoa powder
1/4 tsp. salt — yes you need it
1/3 c. butter, sliced over the top of the dry ingredients
Pour 1/3 c. boiling water over the top and mix until smooth. Mix in 1 tsp. vanilla.
Notes: I use the microwave to bring the water to a boil, and I start off with 1/3 c. plus about a Tbsp extra. You do lose some to steam. If frosting will be standing around for a while, keep the beaters handy because it crusts over quickly — just beat it again for a few seconds and all will be well.
After making this dessert, I had frosting leftover. Put it in a freezer bag, label it, and either refrigerate it (a month) or freeze it (6 months). You never know when you might want a bit of chocolate frosting on hand. Like when you pull that extra cake layer out of the freezer ;)
Espresso Ganache
Six steps to chocolate heaven! This can be used for truffles, poured topping, glaze, or (whipped) frosting.
8 oz whipping cream*
2 to 5 Tbsp dark roast or medium-dark roast coffee, ground for French Press or Coarse Drip (adjust quantity depending on how strong you want the coffee flavor)
16-18 oz dark or bittersweet chocolate
1/3 c. butter
1. Heat cream just to boiling in a small saucepan. Add coffee; stir briefly just to submerge it. Let stand 5 minutes.
2. Meanwhile, chop chocolate into chunks ranging from chocolate chip to kiss-sized pieces. Place in heatproof bowl. Warm butter to soft spreading consistency.
3. Reheat coffee-infused cream almost to a boil, stirring only the top layer so you can see what’s going on ;) NOT stirring prevents some bitterness.
4. Use a fine mesh strainer to strain all the cream over the top of the chopped chocolate. Let stand 3 minutes.
5. Using a skinny spatula, knife, or small spoon, start stirring in the center of the chocolate. Stir Stir Stir! Start stirring in more from the sides as things start to combine. After a few minutes, it magically turns into one glorious shiny smooth substance called ganache! Scrape sides and stir until all chocolate pieces are melted if there are any left. Any fine granulation from the coffee grounds can be ignored.
6. Once ganache can be considered warm but not hot, stir in the very soft butter until no streaks remain. Here’s the butter, and the finished still-hot ganache showing some coffee particles and some air bubbles (white):
![]()
Ganache Notes: For this dessert, the ganache needs to be cooled just until it is thick but still very pourable — think cool corn syrup, cold maple syrup… thinner than normal yogurt but not by much. You want it to be able to level itself out, but not to be so runny or warm it melts/oozes through the frosting wall you created around the top of the dessert. There’s some lattitude but now you should be able to judge. What’s the worst that can happen? It looks odd… ? It’s still chocolate ;)
Only about 1/3 of this recipe will be used for the stacked dessert; adjust quantities if desired.
Best results if chocolate and bowl are warmer rather than cooler.
I used a combo of Trader Joe’s Belgium import Dark, and Lindt Excellence 70% Cacao.
More Notes: Follow any standard instructions for making hand-formed truffles. I like to roll these in Ghiradelli’s “Sweet Ground Chocolate with Cocoa” or unsweetened cocoa powder sifted half and half with powdered sugar (dipping is just too much work/mess.) You can also easily find instructions for whipped ganache frosting and glazes.
*Whipping creams now often come with added ingredients which help stabilized it once it has been whipped. Look for the cheaper store brands for whipping cream that does not have these thickeners/stabilizers in them. Natural food stores are also likely to have pure whipping cream although I haven’t checked.
—————
![]()
All that’s left is to eat it! You can see from this last picture that there isn’t much by the way of a filling layer between the cake and the cheesecake layers. That’s how you want it. The cheesecake gives off moisture and will slide around on the frosting — not good. You want that moisture to seep into the cake and stick them together as it waits to be cut and eaten. It works! You only want to use enough frosting between those layers during the assembly to glue them right then.
Cut with a knife that’s been run under hot water then wiped dry; do that between every cut for the prettiest plating!
Happy baking!
Gail


.jpg)