

![]()
Warning! This is a monstrous how-to post for no-sew fabric covers. Although this particular dust cover has a specific purpose, you can use these no-sew hemming directions for anything you wish! This post is Just For YOU, non-sewists! Also included are my tricks for cutting a very large rectangle of fabric without any special cutting equipment.
If you need a dust cover for anything, or a tablecloth for card table or other small table, or a dresser scarf or table runner, or something for the holidays… this is a nicely finished no-sew fabric rectangle that can be made to any size you need! At our house, my husband’s desk sits behind our sofa, and his back is to the kitchen. Anytime we have a food event, he clears it off and we fetch a tablecloth or chunk of fabric and fold it somehow to fit so we can use his desk as a food or beverage buffet. How much nicer would it be to have a something just the right size? Hmmm!
My ScrapRack friends have been looking forward to this post for a month now. We all want designer custom ScrapRack dust covers!*** The actual No-Sew ScrapRack Cover pattern *** has a chart with dimensions for purchasing, cutting, and finished fabric sizes of the ScrapRack Cover. But I will also spell out the magic formula so you can make a cover in any size you want or need! (It’s the last section of this post.) You might check the ScrapRack Cover chart, though — one of those sizes may be just right.
![]()
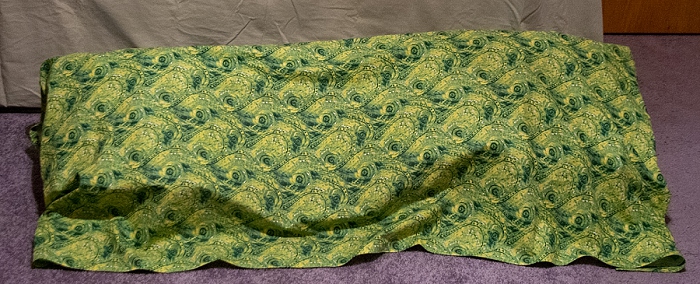
That is a sad picture. I can’t wait until the day I have my creative ~studio~ finished and have my ScrapRack set up in a place of honor! In the meantime, “Bingo” my ScrapRack will be in no danger from dust, breezes, or the curious :)
ScrapRack Covers have magnets along 1 or 3 edges, to hold the covers onto the rack. I have pictures and how-to as the third set of instructions below. Keeeeeeep scrolling to find them!
Special thanks to Dewana Curry Rohl, a ScrapRack owner/user, for test-driving these directions adapted for a sewn version! A sewn version will be available soon — mitered corner lessons for everyone! :) When is World Scrapbooking Day?
Here are the supplies you need: fabric, a package of Heat n’ Bond Ultra (red pkg) paper-backed fusible tape in 5/8″ wide (7/8″ will work) (Other brands could be used, but it must be the kind with the paper backing!)
For the ScrapRack cover, you also need: round ceramic magnets (see fabric chart for how many), glue such as Fabri-Tac, Aleene’s Jewel-It, or any jewelry glue that claims to remain flexible.
Here are the tools you will need: fabric scissors*, an ironing surface* and an iron, a few straight pins (optional), tape measure, pencil or other removable fabric marking pencil that will show on your fabric (NOT PENS), painter’s tape or masking tape, and a place where you can lay out the piece of fabric flat and straight, usually a dining table with its leaves in, or the floor. A full sheet of poster board can come in handy for making squared-up and straight lines to cut, especially if you are working on the floor.
![]()
*Scissors: if they’ve cut very much paper, felt, or fleece they likely won’t be sharp enough to cut a good edge on fabric. A basic pair of Fiskars would be a good purchase!
*Ironing surface: an ironing board makes things easier, but you can stack up some layers of terry towels to act as a giant hot pad on your kitchen counter; at least an inch thick, and then I’d say about 2-3 feet long and 8″ wide as a minimum area. A large quilter’s pressing mat would also work.
One of the most important things for the success of this project, or any project using iron-on fusible anything is that the fabric be washed first. The fusibles can’t melt into the fabric’s fibers when there is sizing or other fabric treatments coating them, or even if there is fabric softener sealing up those fibers. Soon, the fusible products just peel off. Wash and dry according to fabric’s care instructions with no fabric softener!

![]()
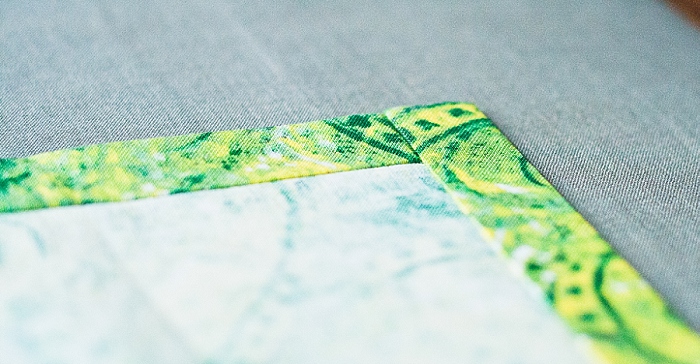
This cover has a nice finished hem, made by folding the fabric edge over twice before fusing it. It takes a bit more time, but it looks so good and won’t ever ravel! This is one reason I chose the paper-backed version of fusible hem tape — the paper itself becomes a tool for getting those edges folded and pressed into place neatly.
Time for the how-to sections! First, making a fused hem, then cutting large pieces of fabrics into square-cornered rectangles a specific size. After that some magnet talk for the ScrapRackers, then the Other Sizes section that will show you how to figure any size custom cover you want!
How to create a double-hem with tidy corners using paper-backed fusible tape.
Heat n’ Bond Ultra (5/8″) suggested. I like Heat n’ Bond because it does not require the use of a damp pressing cloth or steam. Easiest product out there!
Place the fabric RIGHT SIDE UP, so you are looking at the pretty side. Heat your iron to the suggested heat setting, usually medium (wool/silk.) Turn off the steam.
First, the paper-backed fusible tape will be lightly ironed along the very edge of the fabric. You want a TINY bit of the cut edge to show. If your edge is really choppy, just imagine a straight line; there will be opportunity to trim it later.
![]()
Read the directions to YOUR fusible product for how much time to iron for this first step in the process, and for what temperature your iron should be. The time will vary from 2 seconds to 8 seconds depending on your brand of fusible, and it does make a difference! Get prepared to count seconds.
Starting at one corner of a short edge, anchor the end of the fusible tape, PAPER SIDE UP to the corner of the fabric: touch the nose of the iron to the paper for 3-5 seconds. Anchor this corner to the ironing board with a pin to make things easier…
![]()
Hold the tape about a foot away, lay it onto the fabric very close to the edge (keep hold!) March your iron along the tape, keeping track of your actual iron-print. You want every inch of tape attached! Hold the iron in place for the recommended number of seconds; do not iron for too long! Repeat by hopping your iron — not sliding! — until you get to the other corner of the short end, shifting fabric as needed (unpin the first corner.)
![]()
Just before you get to the end of this side, trim the tape to the right length — a little bit shorter — and then press it down. Notice that I used pins stuck into my ironing board to keep the fabric from slipping off.
Repeat on the other short edge. Leave the paper tape in place until instructed to remove it; you need it for the rest of the process!
If you have any jagged fabric that sticks far past the edge of the paper’s edge, trim it away. This is not necessary unless it is a suddenly-appearing chunk, OR a lot more than 1/8″ wide. Honest. I didn’t trim off the jag (two pictures up, on the right) on purpose, just to see how it turned out. I, Perfectionist Sewist, could not tell where it was when I was done. On the other hand, sometimes you have the reverse problem…
![]()
You don’t want to get this adhesive stuck all over your ironing surface. If you end up with an inward jag or curve like I did here, use a scrap of already used/peeled paper backer to put under the area. You can also use baking parchment, foil, or a teflon pressing sheet (even just paper) to protect your ironing surface.
Ready, set, 1,2,3,4! Turn your fabric over (upside down.) Fold the edge over so you can see the paper tape. Fold it over again so the paper is hidden. Snug up the folds *lightly* so they are about the same size as the paper tape inside. (This is a forgiving hem, but you do want the edge of the paper tape to define that first fold.) Press this double fold in place an iron-print at a time, leaving the paper in place…
![]()
On these first two (short) edges, go back and trim away 1 1/2″ (4cm) of the fusible tape/fabric at each corner. This will take away some of the bulk of the corners — easier, tidier and more elegant results!
![]()
Peel off the paper backing slowly. Put folds back into place and fuse the hem: One iron-print at a time, fuse according to your package’s instructions. Make sure your iron-prints are meeting up!
![]()
Note: if your fusible product requires “a damp pressing cloth” use a tea towel, flour sack towel, an official pressing cloth, or even a strip of your leftover fabric which has been wetted and then wrung out. Repeat wetting/wringing when cloth is dry.
At the corners, iron the fold in place even though there’s no fusible there where you trimmed it away…
![]()
Once the fabric has cooled, gently test that the hem is fused well. If it peels up easily, go back and repeat the fusing in those areas making sure that your iron is at the right temperature setting, you are pressing each iron-print long enough (use clock), and you are meeting/overlapping your iron-prints (!) Importantly, if your product required steam/damp pressing cloth, you may not have had enough moisture.
I was testing Wonder-Under paper-backed fusible tape in both the regular and strong-hold versions while I was making this cover. I defintitely found that it was not bonding in places where there was not enough moisture! The parts where I used my fave HnB were so much easier :)
Now for the long edges! It’s almost the same, but easier!
Turn your fabric right side up again. Press the paper-backed fusible tape in place along the long edges just like you did the short edges. The tape should start and stop just barely before the ends, as before. (To help you keep your perspective: this time the ends will be the folded-under, already-hemmed short sides, not the raw cut edge of your fabric.)
Leaving the paper backing in place, turn the fabric over and press the double folded hem in place just like you did on the short edges. DO NOT trim the corners.
Peel off the paper backing slowly. Put the folds back into place and fuse the hem, as before. At the thick corners, continue pressing for 2-3 seconds longer. Let cool; test edges; fix anything that needs fixing.
![]()
DONE!
For the picky crafters: If you have unsecured fabric edges on the corners that you don’t like the look of, you have three choices: 1) Ignore them because you really won’t notice them later 2) secure them with a few tiny hand stitches using matching/blending thread 3) use the tip of a pin to place some fabric glue in between the fabric layers (use tape to cover fabric you don’t want glue on, because this can get messy fast!)
——————————————–
Disclaimer: These cutting instructions are tedious to read through, I know! But when it comes time to do the cutting, follow them one step at a time and you’ll get successful results. One.step.at.a.time!
Lingo: Selvage edges are the woven side edges of the fabric you buy. One selvage usually has manufacturer information and color dots from the printing process. The other is printed the same as the fabric. Selvages tend to shrink more and be hard and bulky in projects, so they are usually avoided or removed.
The Nitty Gritty of Cutting a Large Piece of Fabric to a Certain large Size and Keeping the Corners Mostly Square
My Method, One Little Detail Step at a Time, written for using a table (with notes if you are working on the floor)
Press your fabric if it is too wrinkly to lie flat; avoid sliding the iron diagonally on the fabric.
If your selvage edges have shrunk a lot and are making your fabric curl inward and pucker, make very short snips — no more than 1/8″ to 1/4″ into the fabric — every handspan or so, along the edge. If it still is pulling up, add more snips.
Lay the fabric out on a large table. Tape down about a yard of one selvage edge an even distance from the edge of the table. Use several pieces of tape, and smooth (but avoid stretching) the fabric as you secure it. Make sure the cut end is up on the table! The other selvage edge will likely hang off the table — that’s OK for now. Here’s how I got started:
![]()
(If you are working on the floor, mark your “edge of the table” by anchoring one end the painter’s tape to the floor, then stretching it straight across for a yard or more in the air, then laying it down and pressing it to the floor. You have just given yourself a straight edge to use for laying your selvages along. Interpret the table instructions for your floor set up.)
Straighten and smooth the fabric across the table.
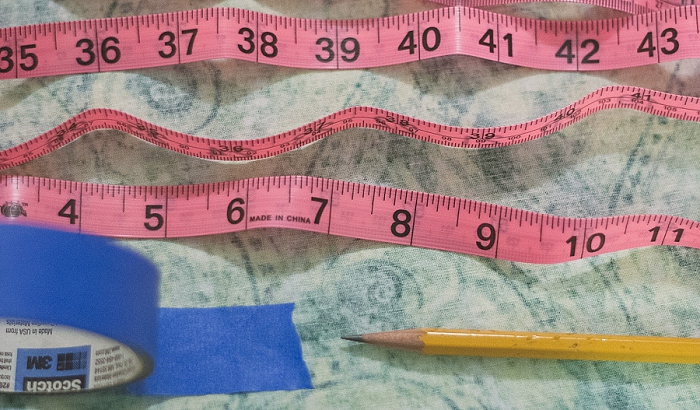
Find a measurement from the table’s edge that will let you draw a straight cutting line on the fabric end. Mine was 3″.
![]()
Use the pencil to mark this same distance all along the fabric at this end. Go as far as you can without shifting the fabric.
Lay a strip of painter’s tape straight along the marks. This is your cutting guide.
![]()
OR! mark your cutting line using a full sheet of poster board as I describe for people working on the floor in the next paragraph…
(Floor: use the whole sheet of poster board to draw marks for your cutting line. Keeping the short edge of the poster board lying straight along the selvage — tape it down! — and mark your cutting line along the long edge of the poster board. Mark all the way across if you have room to tape down the second selvage. Add painter’s tape along your cutting line if you want a more defined line. Move to a hard surface to do the cutting if you are on carpet.)
Cut the fabric along the edge of the painter’s tape, making long even “bites” of the scissors. Let the scissors ride along the table and don’t pull on the fabric. Cut until you have only a couple marks left to go…
![]()
Untape the first selvage and…
Shift the other selvage edge up onto the table. Tape down this second selvage edge in several places just like the first one. Smooth the fabric toward the opposite side of the table. Find the NEW measurement from the edge of the table to the already-cut portion.
![]()
Mark the rest of your cutting line with this measurement (these would be the “new marks” labeled with the sticky note.) Use the painter’s tape and finish cutting this end of the fabric as described above.
(Floor: to complete the marking on this end of the fabric if you don’t have room to do it all at once, flip your fabric upside down. Repeat what you’ve done already, lining up your posterboard with the selvage edge AND your previously cut portion.)
—– One short end is now cut nice and square. Moving on to the next short edge!
Make a mark at the halfway point for the total length you need to cut: Mark both selvage edges with the pencil, measuring HALF of the length from your freshly cut edge. My ScrapRack Cover calls for cutting it 74″ long. I made a mark at 37″ from my freshly cut edge, half of 74. It is much easier and more accurate to measure and mark distances that are less than our arms’ reach!
![]()
Untape everything and swap ends of the fabric. Before taping it down again, measure and mark the other half of your cover: measure from the halfway mark down to the full length you need to cut and make another pencil mark. Do this on both selvages. My two new marks were another 37″ from my halfway mark — now 74″ from my nice straight freshly cut end.
![]()
Optional: Double check that the marks on each selvage edge match pretty well by bringing your freshly cut corners together and hold them up in the air, letting the two selvage edges hang down beside each other and match up. Your halfway marks and your final-cut marks should match pretty well. Adjust one of the final-cut marks if needed but you don’t need to be too picky! There’s lots of roominess in this cover; within an inch of each other is fine.
![]()
I double-checked that my 74″ lengths matched. I did this while I had one taped down on the table still, instead of matching the corners and holding them up in the air. These are matched Well Enough!
Place the fabric on the table so you can work on marking and cutting the second end. Make sure these new marks for your second cut are up on the table and not hanging off the end of it.
Tape down one selvage edge evenly along the table’s edge for about a yard. Proceed the same way as the first time:
Straighten and smooth the fabric across the table.
![]()
Find a measurement from the table’s edge that will let you draw a straight cutting line on the fabric end. This time, mine was 3 1/8″. (I had an extra-long piece of fabric so I was feeling for the edge of the table through the fabric.)
Use the pencil to mark this same distance all along the fabric at this end. Go as far as you can without shifting the fabric.
Do not cut yet.
Move the other selvage edge onto the table and repeat the instructions for this, doing it the same way as the first time. Make sure that your marks coming in from both edges line up pretty well. If they don’t match up, re-mark the center part of the line so that it straightens out the mismatch.
Remember that this part of your cover will not only be turned under twice for the hem, but tucked under the wings of your ScrapRack with a magnet — don’t get crazy ;) but you don’t want an obviously curvy line.
![]()
Place the painter’s tape along the marks and use it as a cutting guide for cutting this second end.
Untape everything.
As straight as possible, cut off the white selvage along the line where the fabric print starts. If you are using a solid-colored fabric, measure, mark, and trim off 1/2″ (1.5cm). It is easiest to cut narrow strips of fabric if the narrow strip can be held loosely in line using your non-scissor-wielding hand. Let your scissors ride along the table and don’t pull or lift the fabric as you cut.
![]()
Tape down this trimmed edge along one edge of the table the same way you previously taped down the selvage. Measure and mark your width measurement every few inches, either from across the table, or a certain distance from the edge of the table (like you did for the ends, only this time, you are marking the long edge.) Use the painter’s tape again as a cutting guide and to even out any unevenly placed marks. Double check your measurements once the tape is in place. Cut …
![]()
… and now you are READY FOR HEMMING!
Repeating my disclaimer: The instructions are tedious to read through, I know! But when it comes time to do the cutting, follow them one step at a time and you’ll get successful results. One.step.at.a.time!
——————————————–
Click here for the PDF of the fabric chart for the ScrapRack-specific sizes. But take a look if you are looking to make a different kind of cover/cloth — maybe one of these is JUST the size you can use for your other purposes, too.
The PDF includes everthing the novice fabric shopper needs to know to choose a fabric that will work well for a ScrapRack Cover or other fused-hem cloth. It includes a chart with all the measurements for covers for up to 6 ScrapRack bases. It guides you through the blocks of information above, so you can create your own designer cover! Soon, I hope to have all this information including pictures in one PDF for the ScrapRack Community. Just not quite there yet — thanks for your understanding!
Here is the final block of information you need to finish your ScrapRack Cover!
Mark and glue magnet positions on your ScrapRack Cover
The quantity of 1/2″ round ceramic magnets needed for each cover size is given in the fabric chart of the PDF above. Suggested glue is Fabri-Tac; secondly Aleene’s Jewel-It. Jewelry glues and other multi-surface glues can be used at your discretion.
Fold the cover in half, bringing the short ends together.
![]()
Measuring from the fold, mark spots for magnets along the BACK EDGE (long edge) at the measurements below. Mark both halves! (Pictured: 2-base cover.)
1-base: mark 7″ away from center, and again at 18″ away from center.
2-bases: mark 8″ away from center, and again at 26″ away from center.
3-bases: mark center, 15″ away from center, and again 32″ away from center.
For ScrapRacks bigger than 3 bases using two 2-base sized covers, the magnet placements for the long back edge are the same as listed above; for the short sides, leave off the magnets from one left side and one right side, since they are not needed where the covers overlap in the center of your ScrapRack.
Special note for the special-sized 2-part SR Cover for a 4-base unit listed in the chart: Start measuring along the BACK EDGE from the outside (wing) corners of each piece: mark 10″ from corner and every 16″ along the edge. Adjust the last magnet so it is 2″ from the corner (this is the corner that will overlap the other piece of the cover.) Repeat in mirror image for the other piece. See how to do the wing-SIDES below.
Here is how the cover fastens onto the back and wings of the ScrapRack:
![]()
1. Back edge flipped up. You see how much extra there is for very-full ScrapRacks — those back-edge magnets can slide upwards by about 6″. 2. Cover is back in place as low as it can go in the back. 3. (top right) peeking under a wing from behind with the magnet unfastened; side edges are not fastened either 4. The two side magnets unfastened and folded back; they wrap neatly around the dividers and under the wings for a couple inches when fastened.
If you want to secure the FRONT EDGE of your SR to the tiny bit of metal that shows below the spinders, mark the front edge the same way as the back, skipping the two magnets closest to the corners. It would look like this when fastened in the front:
![]()
Two options for the SIDES, which wrap and magnet under the wings: you can place one magnet at the halfway point of the short sides, or two that are each 5″ away from the halfway point. The two-magnet option is shown:
![]()
Set up for gluing: Protect the surface underneath the SR Cover where you will glue the magnets. Use shopping bags, plastic wrap, foil, or what I did: a cheap sandwich baggie under each spot.
![]()
BACK EDGE and SIDES: Squeeze a generous puddle of glue onto the ceramic magnet (keeping it away from the very edges and therefore your fingers.) Quickly place the magent on the mark so it is mostly on the hemmed area, but also hangs over onto the main part of the cover. Give it a gentle press and wiggle until you feel it touch down onto the fabric; you might see some glue ooze out from underneath — this will help hold the magnet so leave it.
FRONT EDGE (optional): Squeeze a generous puddle of glue onto the ceramic magnet (keeping it away from the very edges and therefore your fingers.) Quickly place the magnet on the mark so it is just barely peeking over the edge of the cover. This will let the curved edge of the magnet grab onto the front edge of the ScrapRack base in that narrow space.
Let glue dry for a day before use. If magnet hold is too strong, stick a small patch of washi/other tape on it.
————————————–
HOW TO FIGURE OUT YOUR CUSTOM PROJECT FABRIC NEEDS FOR
OTHER SIZES of FABRIC DUST COVERS, TABLECLOTHS, RUNNERS, etc
The suggested fabrics are is usually 41″ — 44″ wide. This basic cover is limited the width of your fabric AFTER the selvages (woven edges) have been trimmed off, so about 39″ max width that you can plan on.
1. Figure out your final project size, both width (the shortest) and length (the longest.) This will be called your FINISHED SIZE. For bumpy or lumpy items you want to cover, this is done most accurately by actually draping a sheet or other fabric and using pins or tape to mark the size. Draped fabric acts differently than a draped tape measure!
2. Add 3″ to each of those measurements. This allows for the hems on all 4 edges. (Metric: add 8 cm – 10 cm) These will be called your CUTTING LENGTH and CUTTING WIDTH.
3. Figure out how much fabric to buy. For the non-math people!!! — play along; it will all work out!
- Round your cover’s length up to the nearest 20″. Yes, that’s a lot but it’s just a number, not a fabric requirement!
- Discard the zero on the end.
- What’s half that number? Add that small number to your CUTTING LENGTH
- Now *also* add another 12″ to your CUTTING LENGTH
4. This is your final FABRIC PURCHASE requirement. It allows for shrinkage of the cotton fabric because, yes, you must wash the fabric for good results with the fusible hem. It also *generously* allows for how the cut ends of your fabric will probably not be straight after the fabric is washed.
5. When you buy your fabric, let the cutting counter person round it up to the nearest 1/8 yard if you wish. Often times they will know if a certain fabric has unusual shrinkage or is extremely “off-grain” and if you should buy more because of that — ask them. But you already have plenty extra for normal cotton fabric.
6. Work your way through my instructions for cutting the fabric to your CUTTING WIDTH AND LENGTH measurements, into a reasonably square-cornered rectangle, one step at a time.
7. Follow my instructions for making a double-folded fused hem using Heat n’ Bond Ultra fusible tape at either 5/8″ or 7/8″ wide (Note: the 7/8 will result in a very slightly smaller (by 1/2″) finished project but a wider hem, which is sometimes nicer.)
Wow. I’m done. :)
Gail


.jpg)