

![]()
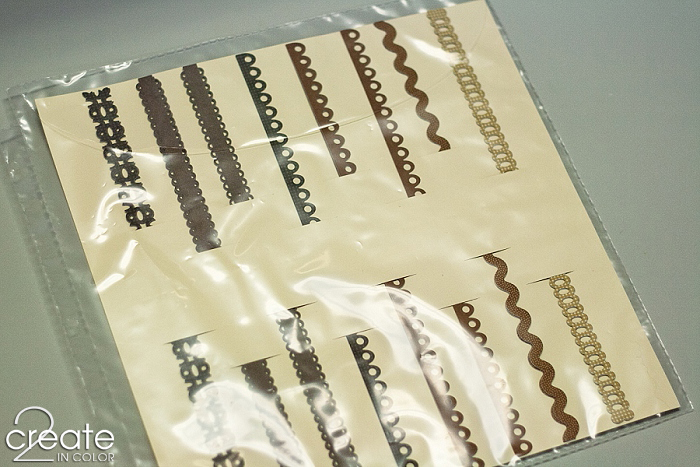
What’s that picture about, right? It is about storing my papercrafting borders…
I may have, just maybe (a time or two) mentioned that I’m moving all my scrapbooking and papercrafting supplies into a ScrapRack using the 4-section system. You, I know, just miiiiight have picked up on that. I’m VERY excited by this, as it solves a lot of my papercrafting stumbling blocks: digging out supplies stacked in containers that need to be unstacked, opened, searched through, then dealt with when I go to find the next thing I need. And then putting stuff away in the right place, closing, stacking, and storing said containers. OK! That’s the set up for today’s post!
![]()
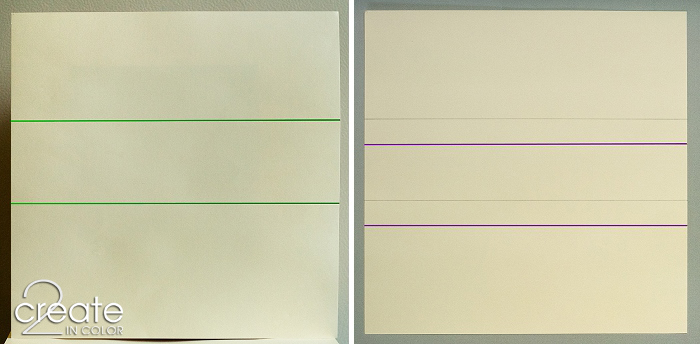
1. Draw horizontal guide lines for cutting. One set at 4” and 7” down from the top (green.) One set at 4” and 7” up from the bottom (purple.) I found my 4×14 quilting ruler to be extremely useful on this project.
One of the things that I L.O.V.E about this system is that there are no lids to containers to deal with, no packaging to deal with aside from a standard small zipper bag for some items – it helps so much to only have one non-mysterious packaging style to open! – and no stacking or unstacking.
![]()
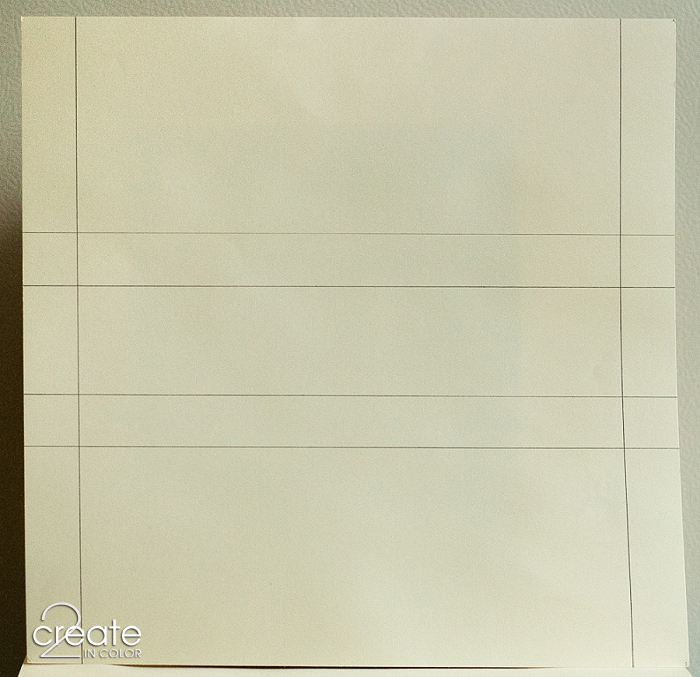
2a. Draw your side margins – don’t cut in this area, so that the page stays stable and sturdy. You don’t have to mark them all the way up and down like I did; I just wanted you to see them.
My stuff also takes up far less space than before. (I know, I know! My ScrapRack groupie-ness is showing big-time!)

![]()
2b. Then mark the width of each section, above the cutting lines (orange box) and below the cutting lines (along the orange line.) NOTE: this sheet will have 8 sections, good for borders 3/4” wide or less. Four different sets of measurements are included below for other sizes.*
I have ordered a wide assortment of ScrapRack page styles to maximize my storage per page: 16 pockets per page for small things like zip-bags of brads, eyelets, clips, etc. 4 pockets per page for larger items like sheets of 3-D adhesive embellishments; 2 pockets per page for large alphabet sticker sheets. And so on. Worked through my stuff, sorted, purged, organized, filled pages, got with the system – cool!
![]()
2c. Line up your ruler and mark the sections on each cutting line – you can draw a solid line up and down, or just make a small tick-mark every time you cross a cutting line.
3. Now you will cut slits — I used a quilting ruler and an exacto knife. Four sets of slits to be cut on that original pair of horizontal cutting lines you drew (green), four sets lines on the second set (purple.) Cut between tick marks, alternating between sets of lines — see right-hand picture above. You don’t need to mark the colors, but DO do something to keep track. Really. This will be the back of your page, so do whatever helps you keep track.
Then I came to sorting and storing my modest assortment of pre-cut border strips. Hmmm.
None of the existing SR pages were really the answer to seeing what borders I had at a glance through the clear pockets. I tried sewing some whole-page 12” x 12” page protectors into long narrow compartments. Not a lot of luck, nor patience at the time to figure it out better! I didn’t try getting out my hot-tip tool to plastic-weld them into compartments as some people have; just didn’t feel like going there. But I have about 90 of these sheet protectors and I wanted to use them!
So I took the paper, pencil, and blade approach and made my own 12” x 12” paper inserts for borders to be stored in the sheet protectors.
![]()
4. Fill the border-storing sheets with your borders from the back side. Work from the center: slide a unique border (or matching bunch of borders, as I have) into one slot. Push them far enough through that you can slip the other end into the corresponding slot. Center it up. Fill the rest of the page and file as appropriate.
Fill from the back side, above, then turn it over and admire your organized and visible pre-cut borders! Slide it into a sheet protector (or into a ScrapRack single-pocket page and into your ScrapRack in the appropriate section!)
![]()
*Here are the measurements for other sizes of borders. Each section should be about 1/2” wider than the border.
Make two sets of tick-marks across the page at these measurements, then cut as directed in Step 3:
- For 1 1/4” sections:
- @ 1 – 2.25 – 3.5 – 4.75 – 6 – 7.25 – 8.5 – 9.75 – 11 inches from one side
- @ 1 – 2.25 – 3.5 – 4.75 – 6 – 7.25 – 8.5 – 9.75 – 11 inches from one side
- For 1 1/2” sections (¾” margins):
- @ .75 – 2.25 – 3.75 – 5.25 – 6.75 – 8.25 – 9.75 – 11.25 inches from one side
- @ .75 – 2.25 – 3.75 – 5.25 – 6.75 – 8.25 – 9.75 – 11.25 inches from one side
- For 1 3/4” sections (¾” margins):
- @ .75 – 2.5 – 4.25 – 6 – 7.75 – 9.5 – 11.25 inches from one side
- @ .75 – 2.5 – 4.25 – 6 – 7.75 – 9.5 – 11.25 inches from one side
- For 2” sections:
- @ 1 – 3 – 5 – 7 – 9 – 11 inches from one side
![]()
Happy me! Success! Easy access to pre-cut borders! I can take one border out at a time. These pages really don’t need any reinforcing unless you are going to let your 5-year-old put the borders in. No need to do more work than needed! Maybe you’ll like this idea for yourself. Or not – that’s OK; this project is really all about me :D
That’s my bit of creativity to share today! Happy crafting!
Gail


.jpg)
Katherine McKamey - Love this idea! Thank you for sharing the details! I’m going to go cut some border pages right now! <301.15.2014 – 7:25am