My giant bag of mixed frozen berries was calling my name, and I answered with this! I bring you breakfast. Or Lunch. Or Snack. Or Dessert… This berry-in-a-mug has a lot of redeeming qualities like antioxidants and fiber, aside from totally pleasing your tastebuds.
I made it extra simple for anyone who doesn’t bake — for baking equipment, all you really need is a Coffee Measure. Yup, that 2 Tablespoon measuring scoop that comes with every coffee maker. I have about 5 of them — scoops, that is! Well… maybe coffee makers, too. If you don’t actually have a coffee scoop, then substitute 2 Tablespoons of the ingredient for every scoop called for.
A 1/4 tsp. measuring spoon would be nice, but if you can eyeball the volume of say, a cooked kidney bean, you’re in business. A regular flatware teaspoon actually holds close to a teaspoon measurement for reference. If you’re new or something. Because that’s A-OK for this recipe! Home baking with a microwave and no special equipment!

Equipment: small bowl, fork, coffee measure scoop, mug — standard size of about 12 oz, a 1/4 tsp. measuring spoon — see above, and another large spoon or something, to put aside a bit of the topping for the top layer.
Foods: flour, brown sugar (or white sugar), quick-cooking oat flakes (or instant but not the sugared/flavored packets), cinnamon (optional but healthy!), butter, baking POWDER, milk or cream or substitution of your choice, 1/2 cup to 2/3 cup frozen berries, which equals your mug about 1/3 to half-full when they are still frozen.

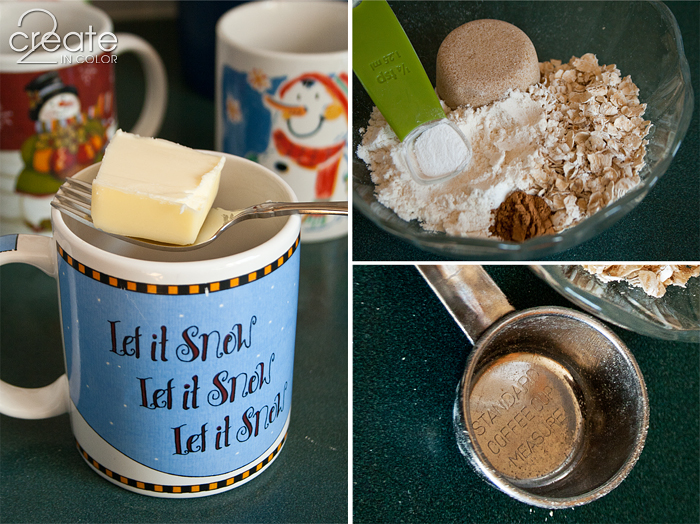
Into the mug, put 1 1/2 Tbsp of butter. That’s a slab of about the size you see in the picture above. Melt it in the microwave for 20 seconds, and then a bit more until it is completely melted. Rotate the cup to coat the sides partway up. Set aside for a minute.
Into the small bowl, and using your coffee scoop, put 2 scoops of flour, 1 scoop of brown sugar (or white), 1 scoop of quick-cooking oat flakes, a scant 1/4 tsp. baking powder, and 1/4 tsp cinnamon. Mix well with fork.
Pour the melted butter over the dry mixture and fork-stir to combine. Set aside about half a scoop of this — but you’ll need your scoop for measuring in a second, so use the large spoon or put this portion of topping onto/into something else.
Pour one scoop of milk over the mixture and stir with the fork until combined.

Now don’t go putting the batter in the mug yet! We have to get the berries ready — I got ahead of myself in the pictures!

Fill your mug about half full of frozen berries — a bit less, rather than more, is the way to go. Put a pinch of flour — literally, a thumb and two-fingers pinch — over them, and a pinch of sugar. Sugar is harder to pinch so use the 1/4 tsp measuring spoon about half full. Or all the way full. Or two full ones… How healthy do you want to go? You can skip the sugar altogether! Right, that’s gonna happen.
Now jostle the cup a bit so the sugar and flour settle down into the berries part way. Microwave for 30 seconds. You want the berries to start giving off their juices, but still be holding their shape for the most part. Now is when you can get the Dumpling effect if you want: microwave them some more until they bubble and steam and give off lots of liquid, 45 sec to 1 minute — then proceed. Pictures of both styles below!
Pour the batter in the bowl over the berries in the mug. Finally, sprinkle the topping crumbs over it! It doesn’t make a dramatic difference, but it makes me happy.
For the normal style, use the fork to coax the batter over to the edges of the mug or the berries will bubble over the whole cake layer. Which is OK. I like mine more separate is all.

If you are going for the Dumpling style, don’t bother. This was an earlier trial. My son was happy to taste-test any and all versions.

Microwave for 1 minute to 1 1/2 minutes. I put my 1200 watt microwave on 80% power (level 8) and it took about 1 1/2 minutes.
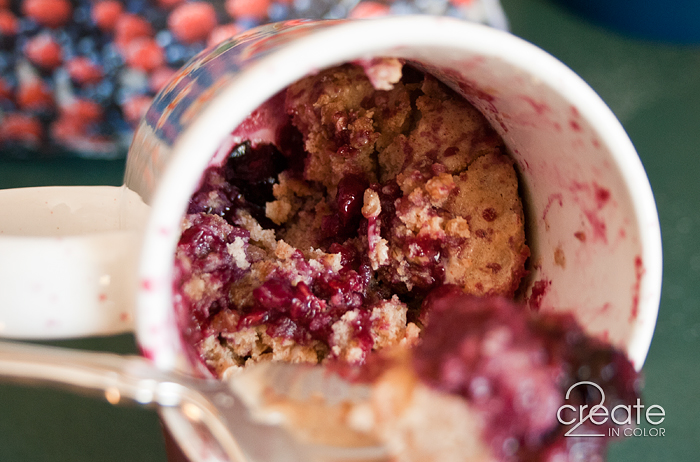
Normal style results — the berries aren’t quite so thawed, and the batter is spread to the edges before cooking…

Dumpling style results — thaw the berries all the way to get max juiciness going, then plop all the batter and topping in the center…

Here’s the important bit AND THE HARDEST BIT! Let it stand for about 2-3 minutes.
Told you it would be hard! Wait until you are actually smelling those berries to see how hard it really is to wait that long. But it is worth it — the cake evens out, cooking-wise, and the berries are just a bit less likely to ruin all your chances of tasting anything for the next 24 hours. I hate that sandpapery feeling on my tongue when you burn it, don’t you!?

Dig in. Enjoy! Go ahead — make another one. You know you want it! (Must try this in my latte mug at twice the size to start with.) And yes, it would be delicious with yogurt or ice cream on top!
Berry Coffee Cake in a Mug
Batter:
4 Tbsp. flour
2 Tbsp. brown sugar (or white)
2 Tbsp. quick-cooking oat flakes
1/4 tsp. baking powder
1/4 tsp. cinnamon
1 1/2 Tbsp. butter
2 Tbsp. milk, cream, or substitute of your choice
Filling:
2/3 c. frozen mixed berries, measured frozen
1/4 tsp flour
1/4 tsp — 1 tsp sugar, to taste
Combine dry ingredients (first 5 in list.) Melt butter in standard 12 oz coffee mug in microwave (about 30 seconds.) Tip and rotate cup to butter halfway up the sides. Pour butter over dry ingredients and combine thoroughly with a fork. Set aside about 1 Tbsp of these crumbs. Add milk to bowl and stir with fork until smooth (except for the oat flakes, of course.)
Put berries in mug, top with the flour and sugar listed for filling. Microwave 30 – 60 seconds. Put batter over berries in mug, using fork tines to spread it out to the edges. Sprinkle reserved crumbs on top. Microwave 1 to 1.5 minutes depending on microwave wattage. Let stand a few minutes to equalize temperature and finish cooking.
—————————–
I have a whole Pinterest board full of other mug-treats from around the interwebs: Mug-liciousness. Check it out! Let me know which ones you try!
Gail (who is just about ready to put the snowman mugs and snowflake dishes away for the winter)


.jpg)
Kathy - Looks delicious. Going to check my freezer for berries…03.15.2013 – 3:25pm
Hill Guy's Wife - […] Everything is better with pie. … I stumbled on this nice little recipe for a single serving Blueberry Cobbler one evening when I was pie-less. Let’s be clear – it’s not pie. But it is tasty and ready in about 3 minutes, so roll with it. (And it keeps you from eating an entire pie so that makes up for the lack of a flaky crust. Sort of.) Check out the recipe here. […]08.03.2015 – 9:38am
Linda - How many does this make?04.23.2017 – 12:59pm
admin - Linda, hello! This recipe makes one mug treat. Make sure your mug will hold about 12 oz. Enjoy! Looking back on this post makes me want to make one even though we are visiting sunny hot Arizona right now! –Gail05.01.2017 – 6:27pm