Here we are! Pie Crust School Lesson #2! Now that I’ve shown you how to make basic pie crust dough, we’re going to use that knowledge to make a real pie and learn another pie crust skill!
It might seem like a lot to read, but this is what’s going to make you an expert! You can do it!
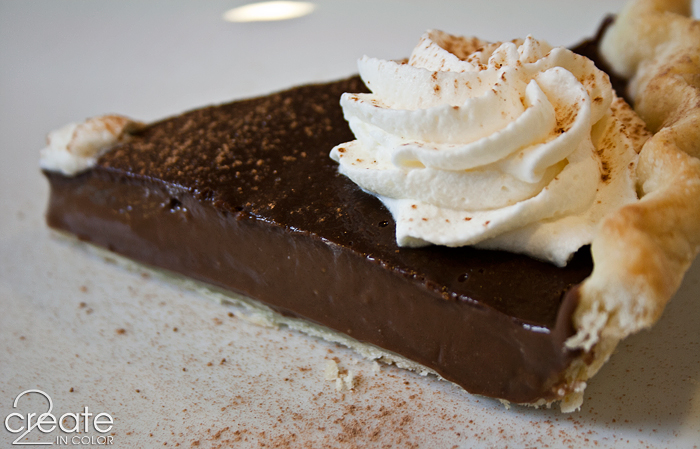
What better type of pie to choose for February, with its focus on all things chocolate, than Chocolate Cream Pie? It’s an especially convenient choice because we can use it to learn how to baking an empty pie shell, also known as baking it “blind.” I don’t know why it is called that but many old recipes mention it, so it’s important to recognize the term.

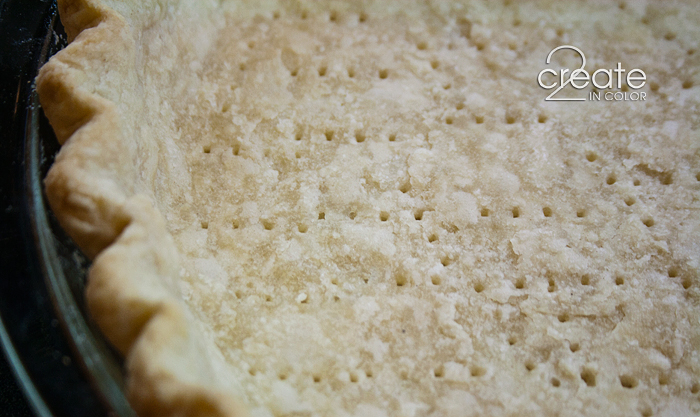
To bake a pie crust blind, there are some important tricks and techniques that will ensure success and I am going to tell you about them right here! One, of course, is to have well-made dough so be sure to follow Pie Crust School Lesson #1. Then you will need some dried beans or pie crust weights to keep the bottom of the crust from puffing up in big bubbles like pizza dough sometimes does – you also must poke some steam holes in it.
Another trick is refrigeration at the right moment for the right amount of time; just as in making the pie crust dough itself we want to make those fats in the dough behave! And lastly, the “when” of taking the beans out, and some aluminum foil craftiness (which you may or may not need.)
MAKING THE DOUGH
If you are of the freezer-cooking mindset, then you’ll probably want to make my whole Double Crust Recipe of dough and put one half in the freezer for another day. If you don’t want to do that, then you will only need to make the Single Crust Recipe (both recipe quantities below.)
The main thing to remember about this particular pie crust recipe is the EASY proportions: 3 parts flour to 1 part fat, translated to 3 cups flour to 1 cup shortening in my Double-Crust Recipe. That amount of dough will be enough for TWO single-crust pies (such as pumpkin, chocolate, lemon meringue, etc) or ONE double-crust pie like apple or rhubarb.
Pictured are the quantities for a single-crust pie.

DOUBLE CRUST RECIPE
3 c. all-purpose flour
1 c. shortening
1 tsp. salt
Iced sugar water: 3 Tbsp sugar, 1/2 c. hottest water, ice cubes and cold water
Directions here.
SINGLE CRUST RECIPE
1 ½ c. all-purpose flour
½ c. shortening
½ tsp. salt
Iced sugar water: 1 – 1.5 Tbsp sugar, 1/4 c. hottest water, ice cubes and cold water
Directions here.
Once you’ve made the dough, pat the dough out into a disk keeping it well floured on both sides; then take the rolling pin to it! On the right: brush off this extra flour before rolling. All this is in the directions linked with the recipe!

PLACE IN PAN
You will always need to roll your crust out several inches larger around than the pan you are using for it to fit the pan well. For a 9” pie pan, I suggest a minimum of 12” across in every direction. Once the rolled-out dough is wrapped up onto the rolling pin, drape the dough most of the way over pie pan. Don’t release that last bit off the rolling pin until you have positioned it well.


For my standard style of rolling pin, this means keeping my index fingers touching the roller to keep it from spinning, and not letting it unroll so much that it ends up sliding all the way off by itself. If it does, just gently lift from below with flat hands, and slide it into the best position.

Once you have the dough positioned, and have let it free of the rolling pin, you’ll need to ease the dough into the corners: lift the overhang and let the dough fall down onto the pie pan surface – gently ease it in, with just enough pressure to make it bend into the corner on its own.

TRIM AND CRIMP
Trim the dough so there’s about ½ inch beyond the top level of the pan. For a lot of pie pans that means right along the outside of the rim, but if yours doesn’t have a nice wide rim then trim it the width of your finger.

I use a small sharp knife for this, letting the overhang rest on the palm of my hand (with my index finger resting alongside the pan) and pressing the knife through the crust but not cutting myself in the process! I can judge the same measurement for cutting all around the pan this way. It does not need to be a perfectly smooth even cut, because any unevenness will be hidden…
Fold the edge under, leaving it standing up.

Crimp, or otherwise decorate and reinforce the edge; there are a lot of options using pinching, forks, dough cut-outs, etc.
My mom always used this method (pictured below) and I think it is the absolute easiest way to get a consistently spaced, attractive crimp, and I tried them all. Your finger becomes the measuring tool – your left index finger rests in the curve of the crimp you just made, and you make the next pinch-and-twist motion with your right thumb and index finger. Then you just move the left index finger along and repeat!

It’s easy to adjust the last 3-4 crimps so it all comes out even and happy :)
COVER AND CHILL
Put that crust in the refrigerator for 20-30 minutes, covered loosely with plastic wrap. You’ve just handled it a lot, and we want those fats to firm back up before baking, especially because there won’t be any filling pressing against those sides! Note: When you use butter instead of shortening in pie/tart dough, you must always refrigerate it at this point. Trust me on this.

I take this time to clean up my pie crust making mess and measure out the ingredients for the filling.
SCRAP SNACKS
Many American kids have grown up eating a very simple treat made with scrap pie crust. It is so easy! Place the crust scraps on some foil or a baking sheet, smear them lightly with some soft butter or margarine, and then sprinkle heavily with cinnamon sugar. Bake it for about 5-8 minutes at the 450 degree oven we are using for the pie shell.

At lower temps it can take 15-20 minutes, just check on it every 2-3 minutes at higher temps! You are looking for a lumpy bumpy top surface, meaning the crust is cooking and steaming into its flaky layers inside. Take it out before the edges start to brown heavily. Let it cool for 5 min—don’t want to burn the top of your mouth with hot sugar and butter!
PRICKING AND WEIGHTING THE CRUST BEFORE BAKING
This brings us to the next technique for baking blind. That lumpy bumpy top surface of the pie crust cinnamon snacks is exactly what we DON’T want to happen in our pie shell! Yes, we want those flaky layers, but we don’t want the dough to have tall air pockets which will break when we put the filling in. When those break, it would let the moisture from the filling seep into the crust and you would lose strength and that lovely flakiness. So how do we prevent those puffy air pockets?
Since there is no pressure from a filling to keep those steaming layers of flour and fats from puffing up, we will add some pressure by baking the crust filled with something: You can buy non-perishable ceramic pie weights, but it’s easy and cheap to use dried beans and most bakers do. I repeatedly use the same bag of small red beans.

Let me tell you something. It is ANNOYING to pick the beans off the hot crust surface itself if you don’t put a liner of some sort between them. Plus it means washing the beans/weights (which means I would – did – just throw that set of beans away!)
To line the crust, I have found nothing better than baking parchment that has been well-crumpled and then smoothed out. You can do the same thing with foil, but don’t let there be any tears in it. The reason for crumpling and smoothing is to make the liner as pliable as possible. Any sharp bend will poke through your unbaked crust – bad. So crumple away until it is evenly flexible.
Before you place the liner and beans, take a fork and prick the crust all around after it has chilled. This also greatly prevents air pockets by creating ready-made steam vents in the crust.

(In case you are getting imaginative right here, plastic wrap is only good to 350F (if that,) and even cotton fabric will scorch badly at 400F – we’re using 450F. So, “no” to those choices.)
Please note that you need the liner to be large enough so that you can pick up the whole batch of beans by the 4 corners. You want to be able to do this quickly because the crust needs to go back in the oven for a few minutes afterwards. I also make sure I have something safe to set the hot beans onto at this point, usually an oven-proof plate, but you’ll see them resting on a folded thick cotton towel this time.

Can you see, right there at the 12 o’clock position, how the side kind of bubbled out and sagged down? I should have had the beans scooched up against that area a little bit better. But you can see what might happen to the bottom surface, and what ALWAYS happens to the sides if you don’t fill the empty pie shell with something to blind bake it, and also refrigerate it before baking.
SHIELD FROM OVER-BROWNING
The last trick to discuss is how to keep the top edge of the crust from becoming too brown. If you have gotten a goodly amount of sugar into your crust mixture, over-browning could definitely be a problem when blind baking a crust. Depending on the fat you used, the expression on your face while mixing, how many hands you used to put the pie in the oven… kidding about the last two, but sometimes it is hard to know why one crust will brown more, and seemingly the same crust won’t on another day. So here’s the fast and non-fussy way to shield that top edge if it needs it toward the end of the baking period.
Foil. Fold a square in fourths. Tear a quarter circle out of it. Unfold, revealing the 6” – 8” hole you tore out (so the rest of the crust can get heat, and for steam to escape.) Rest it on top of baking pie / pie crust. It covers the perimeter of the crust but not the middle – clever, eh? No digging in a drawer for, and trying to balance, those purchased pieces on the crust’s edge over a hot oven!
(Foil pic coming soon! Argh.)
BAKE
Baking directions in the list below, steps 8 and 9.
OK then, ready? This is how it goes!
- Make crust for a single-crust pie.
- Roll to 12” – 14” rough circle, about 1/8” thick.
- Place dough over pan and ease in.
- Trim and crimp edges; refrigerate 30 minutes.
- Preheat oven to 450F (425F for glass pan)
- Prepare lining for beans/weights; place in crust after pricking with fork.
- Set out a landing place for hot beans.
- Bake 8 – 10 minutes – the tips of the crimped area should barely be starting to show some color; remove from oven — close oven — remove liner with beans — return to oven.
- Bake 2 – 5 minutes more until bottom looks like pale-but-baked pie crust! Use foil shield for top edge during this time if needed.Total time: 10-15 minutes depending on your oven.
- Let crust cool; fill with your choice of filling!

You’ve done it! Blind baking a pie crust opens up whole new worlds of not buying pre-made shells :) or pre-made pies. It’s your choice, but I encourage you to practice up on pie crust with me every month, and then make your own perfect crusts for holiday pies this year. You can do it!
And now, as promised, my mother-in-law Pat’s recipe for Chocolate Cream Pie filling. This filling is not overly rich or too chocolate-y. You feel like you’ve had a great dessert, not a decadent “I shouldn’t have” over-indulgence. It’s perfect.
The most difficult parts to it are separating the eggs and stirring the yolks into the filling — those are not difficult at all! Otherwise it’s all just measuring and stirring. MMMmmmmmmmm!

Pat’s Chocolate Cream Pie Filling
For a 9” pre-baked pie crust
1 c. sugar
1/3 c. unsweetened cocoa powder
3 Tbsp. cornstarch
¼ tsp. salt
2 cups milk
3 egg yolks, combined with a fork
1 tsp. vanilla
2 Tbsp. butter
Sift cocoa powder before measuring if especially lumpy. Stir together sugar, cocoa powder, and salt in a medium saucepan. Stir in 2-3 Tbsp milk to make a paste, until all dry ingredients are moistened. Stir in remaining milk. (All this prevents cocoa lumps.)
Cook over medium heat, stirring constantly, until it begins to thicken, 7-10 minutes. Remove from heat.
Thoroughly stir a couple tablespoons of the hot chocolate mixture into the egg yolks, stirring immediately so egg yolks don’t cook solid in hot spots. Repeat until yolk mixture is hot and completely stirred together with the chocolate, using about ½ cup or more of the hot mixture. (This is called “tempering” the eggs, to keep them from cooking instantly upon contact with a hot mixture.)
Add this egg mixture back into the pan, stirring constantly.
Return to heat and cook 2-3 minutes more, stirring constantly, until mixture reaches 160F (safe temp for eggs.) If it gives you a blurpy bubble or two, you’re done!
Remove from heat and stir in vanilla and butter. DON’T FORGET THIS STEP. It happens :/
At this point you may also add any solid chocolate (an ounce or so) you may want to incorporate into the filling – stir until melted. It’s a nice splurge ;)
If you don’t like the skin that develops on top of fillings of this sort, cover the surface with plastic wrap and cool completely in refrigerator before filling the pie shell.
Otherwise…
Pour hot filling into baked shell, cover loosely and refrigerate. Top with whipped cream and any other garnishes you wish to use once it is cool.
NOTE: This is originally a microwave recipe for the era of 600W microwaves, which my mother-in-law had until her recent kitchen remodel. It is possible to translate these recipes for use in higher wattage microwaves with Inverter-style power settings (the microwave puts out power constantly at the lower level, as opposed to the type which cycle on 100% / off 0% to create the effect of a power setting) I have not tried this recipe in my inverter-microwave, and there are SO MANY wattages on the market right now that I’d suggest you conduct your own experiment with your personal microwave. Email us using the link under the blog banner if you want the original microwave directions!

Whipped cream: 1 c. heavy whipping cream, ¼ c. powdered (confectioner’s) sugar, 1 tsp vanilla. Beat cream until frothy. Beat in sugar and vanilla; continue beating until peaks form. Dollop, spread, or pipe onto top of pie. I use a whipped cream stabilizer called WhipIt so the cream doesn’t separate for several days; this packet of powder gets added at the same time as the sugar. Also, for tangy pies, I up the sugar to 1/3 cup.

Tomorrow for my Wednesday post, you’ll find a set of photos to guide you through the filling, whipped cream, and decorating … and eating! I ate a piece of this pie for breakfast the morning I took these pictures! Plus I had whipped cream on top of my French Press coffee – the decadence was thrilling :)

Next month, authentic tart crust dough (aka sweet paste) with butter! You can use a tart pan, tartlet pans, or I’ll show you a super easy tart/springform pan cheat!
Treat your life’s Loves to a homemade Chocolate Cream Pie this Valentine’s Day (or weekend!) with your own handmade crust. So delicious!
Gail


.jpg)
Joy - Wonderful! I’ve used beans as a liner before but never with parchment paper and always had the sides sliding down. This time the crust is perfect. Thank you.11.20.2015 – 3:02pm